chrisk
Hero member
- Location
- Brisbane, Australia
If you squint, the orange bits make it look like an orange octopus taking part in a Mexican Wave.


I’d suggest that the little bit of Teflon you found, is a small, broken off section of the inner that extends all the way through the length. Quoted the wrong fucken post, but who cares?Great tip, the new cable I have as a spare cannot be used, how do you slide a grub screw nipple up a cable that already has a fixed nipple there. I guess I will have to cut that fixed nipple off and solder the cable end so it won't fray, on second thoughts Andy had these cables copied from his cable so it should have the correct inner-to-outer spacing and fit into the hooks at the bottom and adjust to clearance on the bars. Better check as what's the point of a spare that needs modifying on the roadside. I have some small cable ties to hold that nipple to the clutch arm if the cable breaks. Love to hear tips like that before it bits me on a trip.
Don't use petroleum based products on Teflon or Nylon lined cables. They collect muck and the liner probably swells.That little bit of Teflon was 100mm long or that's as much as I could ease it down the cable, and with it running right up to the nipple, I love saying Nipple, there is no chance of the cable fitting into the slot that leads to the nipple, and that's as suggestive as it sounds. I don't doubt it's a Teflon cable liner so it's probably an after-market Teflon cable that's been modified to fit, they must have pushed it back away from the slot just like I did, pure luck I discovered that trick. I was keen to squirt some lube down the cable till I saw that Teflon bit, apparent you're not supposed to lube Teflon cables? I haven't mentioned the small melted bit of cable outer down near the headers that I found a while back. The cable is now cable Tied away from the exhaust.
Hi Vince , Standard cable should have one fixed soldered nipple at one end that fits the clutch lever, the other end nothing, allowing fitment of solderless nipple! When setting up , when operating the lever to its full movement the external clutch arm should be parallel with the internal clutch rods. Go pass that parallel point and you have gone pass the point of maximum effect of releasing the clutch plates.
Don't use petroleum based products on Teflon or Nylon lined cables. They collect muck and the liner probably swells.
Use silicon spray.
In fact, I use silicon spray on all my cables, it dries and doesn't collect muck. That applies to unlined cables as well.
Paul
I’m no Atlas expert, but the sexual innuendos are noted.
That makes sense.
I’m off to watch reruns of Botched. I’m sure I saw ruptured silicon implants that were leaking and mucky.

There isn't a lower cable adjuster. The cable end simply sits against an abutment on the lower crankcase. Only adjustment possible is with the screwed on cable nipple, there isn't a soldered one.I am adding this here as I had no idea there was a lower clutch arm adjuster hidden under the countershaft cover. The joys of no English Manual to study.
What I really need to do is lay the bike on its side and have a bloody good look under the engine at the lower lever, I haven't seen what's happening down there. Laying my body beside it doesn't help to see the whole shebang down there, the lower frame rails block your view. So I will lay it over and take a pic, I haven't felt any lower lever adjusters at all.
Quote, Then, there's an adjuster screw on the lifting mechanism behind the sprocket cover. Make sure that the lifting arm is square to the rod.
That's why I love this place, Thanks Paul great info. I have had that countershaft cover off before looking at replacing or at least cleaning the chain and sprockets but I hadn't noticed when that cover is off you can see 100mm of the lower clutch arm and ITS ADJUSTING SCREW right there in plain sight. I will have a fiddle with that adjuster tomorrow and see if it improves the geometry of the arm.


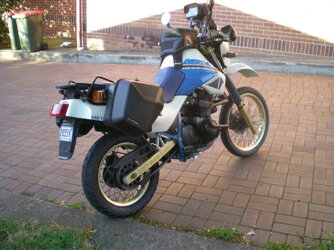
It is fine for the Dakar endurance now!I thought I had posted this pic but I couldn't find it here. It shows the Navigation Tower and phone mount, Tank Bag, Crash bar, Bark Busters and Panniers View attachment 84681I have fitted.