Atlas Questions

Well I managed to patch that 20mm oval hole in the airbox, I used a Coke Can and some Automotive Sika Body fixing glue, I will add some Waterproof Gorilla Tape after it drys. I would have liked to remove the airbox to do this and give it a througher clean BUT to get it out you need to remove the battery and to remove the battery it looks very much like the exhaust needs to come off and that's a 2-day nightmare I don't need right now, BTW the insanely stupid airbox design has curved and recessed corners and impossible to get a finger on the inside roof and said corners that are impossible to clean insitue. It got flooded with contact cleaner and paper towels so hopefully that's good enough. This is by far the hardest bike to do maintenance on I ever worked on. I would hate to have to replace the battery if as I suspect the exhaust needs pulling to do that.
 
One step forward, one back. The left fuel tap is still weeping even after 3 tank drains and assorted fiddling, so it's replacement time. I was dreading the shipping time from Piet's stash in Germany till I noticed there very similar to what's in my Pantah. The Atlas one has the spigot pointing towards the engine requiring a very short hose, 50mm that kinks easily. The Pantah one points towards the rear and will allow a better hose run to the carb.
 
Well I managed to patch that 20mm oval hole in the airbox, I used a Coke Can and some Automotive Sika Body fixing glue, I will add some Waterproof Gorilla Tape after it drys. I would have liked to remove the airbox to do this and give it a througher clean BUT to get it out you need to remove the battery and to remove the battery it looks very much like the exhaust needs to come off and that's a 2-day nightmare I don't need right now, BTW the insanely stupid airbox design has curved and recessed corners and impossible to get a finger on the inside roof and said corners that are impossible to clean insitue. It got flooded with contact cleaner and paper towels so hopefully that's good enough. This is by far the hardest bike to do maintenance on I ever worked on. I would hate to have to replace the battery if as I suspect the exhaust needs pulling to do that.
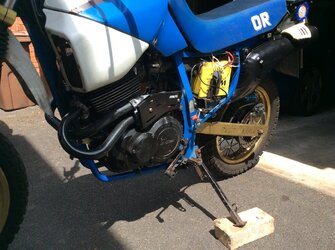
I think you can get to the battery without too much grief Vince, here’s a photo of my other MK2 Atlas.
 

Attachments

  • 1EFBFC07-C3B2-44BD-A211-178A7C026A0B.jpeg
    1EFBFC07-C3B2-44BD-A211-178A7C026A0B.jpeg
    175.1 KB · Views: 21
Hi Andy, did you ever use that battery tender plug on my bike? Keen to know who makes a tender to fit that plug.
 
My battery is way tighter than that pic Andy. It's super close to the air box at the front and a frame rail at the rear and touching the frame at the top. It's stilling on a battery plate that includes a 15mm lip the battery is behind so that needs unbolting and removing. It's crazy tight. I tried removing it today, maybe if I move the exhaust clamp on its mid joint and remove the plate it sits on and covers the bottom edge it MIGHT wiggle out but Its wedged right in there. BTW it got an Italian tune today, I warmed it up after finishing the airbox hole cover and gave it a good flogging, it ran cleanly after a minute or two of hard blipping, apparently no idle jet-blocking effect.
 
I have an Exide Gel 12-19Ah battery fitted, std is a 12-14A is way bigger than std
L= 185mm x W=80mm x H= 170mm, std is 134mm x 89mm x 100mm.
The bigger one fits but it's bloody tight.
 
Hi Andy, did you ever use that battery tender plug on my bike? Keen to know who makes a tender to fit that plug.
Yes. It is the old style plug used on Optimate, Oxford products and many others. You can buy a connector that coverts from ‘type 1’ to ‘type 2’ but probably better just swap the lead to a type 2. most chargers here now come supplied with a type 2 lead.
 
Some time a while back I found a thickened spacer come tube thingy on the floor and wondered what it was. Later I discovered it's a spacer and tube that snaps into the seat mount bolt flange, one on each side. They fall out easily so I was very careful till I wasn't and one disappeared. So I got a replacement made and today I was using some high-tech car body siga-type glue to hopefully permanently glue them in place. So there being glued in and I notice ones disappeared again. I eventually found it on a frame rail corner hiding. So hopefully tomorrow there stuck and will never escape again.
 
I finally got to painting the Pannier mounts and Crash Bar today after an Insane amount of rejigging to adapt them to fit. A huge thank you to Chris P for his help, I have been rooting around with this for probably 3 months. I would love to get them powder coated but there designed as crash protection and repairing epoxy paint is much easier than Powder.
 
I was dreading this job, fitting the heated grips. Your suppose to Super Glue them on as heat doesn't affect Super Glue, or that was the plan. I tried the Throtle side and it was bloody tight, way too tight to have enough time to slip it on before the Super Glue bites. So plan B, I usually use Hair Spray on grips as being Laquer it's slippery when wet and nips up solid when dry so I gave that a go but it turned into what I was dreading. The grip got to within 30mm of correct and stopped dead. So I tried adding more Hair Spray and had to resort to using a block of timber as a drift and another bigger lump as a deadbolt hammer. 15 minutes later it finally got to the right spot, I hope to hell I haven't fucked up any of the internal wiring. I was dripping wet from sweat and fear after that. I hope it's still going to work.
 
Petty is the big word on the net these days with the young people so I hear. Wailing stick maybe. I will know if I fucked it after wiring it up tomorrow. Fingers Crossed.
 
Fitting hand grips,, tried all sorts of slippery stuff, always a PIA. Worse when trying to get them of.
Don't know how fragile heated grips are, but I now use air gun / nozzle only, so much easier and no mess charlie.
 
Brake cleaner as a lubricant, grips either on or off works for me.
Latest cans are acetone free so that's a plus.
Swap spray nozzle for a nozzle with short spray tube to get the cleaner where you want it and then work the rubber with other hand and it acts like a penetrating fluid and works into/between rubber and handlebar and 'grip' slips off or on easy.
 
Yes, all very good except for one thing. The latest Oxford Heated grips have a hard rubberised tube inside with no give at all. There obviously designed for an interference fit as the throttle side is slightly bigger internally to cope with the throttle tube. I had no problem doing the left side with the supplied Super Glue. If I have broken the right side wailing on it with those lumps of timber I have a plan to do better next time. The local distributor, Whites sell spare parts so next time I will measure both bits and turn either or both down to fit on a Lath so with a less tight fit it should wiggle on quicker so it won't jam before the glue goes off. Yes, there are solid I think they will need machining to fit.
 
The left grip works great, the right grip is Fucked. Oh well, it's staying like that for now. Next pain in the arse, I tried to bolt up the Phone mount in the Navigation Tower but that failed as well. It was a complicated couple of plates that sandwich it together or would have except I bought tiny Alan head bolts to use there, except it's impossible to get an Alan Key in that space. I can get a spanner in there so I now need hex bolts to fit that. Not fitting that also means I cannot run the wiring to the phone charging plug so that means I cannot assemble the rest of the bike till that wire goes on. So I thought I would bolt on the freshly painted Crash Bar, till I noticed the bear patches the rattle can of Expoxy Black paint had missed. More paint was required, so I tried fitting the proper Alloy Barkbusters instead of the useless plastic wind deflectors but ran out of light so tomorrow might make more progress. Want to ride it to next Sunday's BBQ and rego day, maybe via The Birdsville Track. More likely via Victoria Rd instead.
 
Last edited:
Back
Top