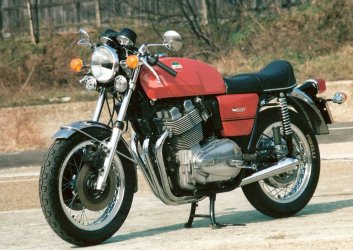
Building my Jota

sideshow said:
I just want to hear what the thing sounds like with the Marving, it will satiate my desire to hear a raw growl and bring the obnoxious teen out in me that used to be there when I was raining around on two stroke street bikes with race chambers on. I know that would be obnoxious in the real world and wouldn't run the bike with it as in spain its not good to get attention to yourself like that with the feds, but it would be cool to hear just because I can. I have the cox ones to try too, but they dont really do it for me aesthetically speaking, I like a bit more raw and un polished, so it seems the exhaust will be a work in progress, I have a few months to sort that out in any case, I have to say its been the biggest question mark for me since I started the project.

I know what you mean.
Like all the youngsters, sound fast when you're doing 30 km/h.
I used to have one on my 3CL. A lot cheaper option when the original silencers rotted through after 5000 km.

Paul
 
I had the Factory 3 into 1 on mine years ago. Excruciatingly loud until I put a 'Jota' style end plate on it, but I could never get it to carburate cleanly. I finished up getting a 40mm piped 3 into a 65mm wide collector into two 'Jota' style resonators, on which it runs a treat.
 

Attachments

  • Hamish's 009 small.jpg
    Hamish's 009 small.jpg
    145.8 KB · Views: 218
I had the same issues when I fitted a Harris 3:1 to my Jota in the early 80s.
The Harris baffle was too restrictive so it ended up with the end cap off a Jota pipe screwed in place.
And it had to run 165 mains to be halfway decent.
In the end I replaced it with a standard system.
 
I got up to 175s with that one before I put the end cap on. Midrange was crap.
To be fair, the system was designed for 7c cams and use on race tracks, not the road.
 
The Sock said:
I got up to 175s with that one before I put the end cap on. Midrange was crap.
To be fair, the system was designed for 7c cams and use on race tracks, not the road.

And no air filter.

Paul
 
Pretty much as soon as I had bought the Jota, I knew what I wanted the bike to look like.... roughly, its a bit of a moving target ( where the exhaust is concerned), i want it to ride and perform well, but I want it to look good. I think the bike will ride well and take care of itself there... its up to me to ride it well! So I needed to get the tank and fairings sorted.
I had been trawling through the forum, and was like a kid in candy land with all the info there. Somehow I had found Boba's website before I saw him mentioned on the forum. with what I saw on his website and the good comments from guys on the forum, it was a no brainer to use him. His gear is stand alone the best quality I have seen for bikes. There are other companies that are making replica items, and from my own experience nothing has come close to the standard that Boba puts out. I work in an industry that is composite professional heavy, I work with grand prix race boats that have full time boat builders building everything and anything in carbon, that they can, so my expectations, from my exposure and work with them are pretty high. They are all very impressed with Boba's work, and these are the guys who build americas cup boats.
I have bought fairings for my Nortons , and a host of front guards  and rear half guards, and seat units. All were  made in the mass production style, more expensive than Boba, but no where as well finished as he does. We are lucky to have him!
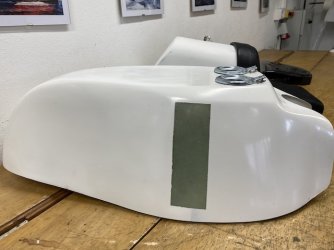
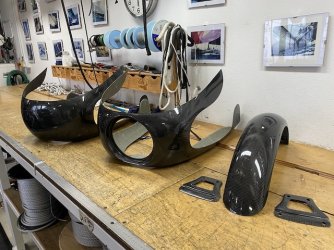
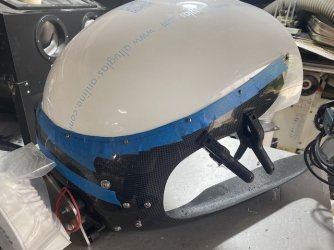
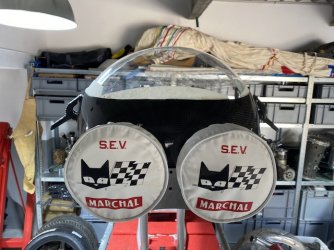
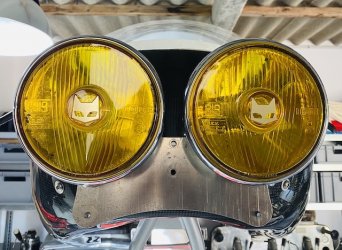
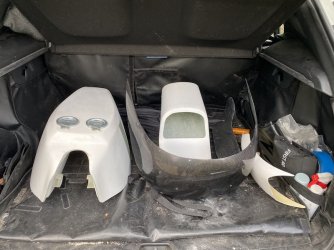
I went through a long list of things with Boba over several  e mails of what I wanted, fairing, tank with fuel level window and two filler necks, seat unit, front guard,  and chain guard, and a couple of side panels , just in case I went that way. I went with his GRP kevlar tank and a GRP seat unit , I knew I would be painting the bike, so there was no need to go carbon mad... I have learnt where and when to use carbon appropriately .  I really wanted the twin Marchal lights up front, but was having troubles finding them, until Marnix reached out from one of my posts in the forum. Initially as I thought I wouldn't find what I wanted ( im not patient by any stretch of the imagination) I had ordered the carbon fairing with the head light cut out. Another quick message to Boba, found he had a carbon fairing without the headlight cut out, so I got that too. The Marchal lights were meant to be! I was travelling to Holland for work, and Marnix was kind enough to let me arrive late at his house on a sunday night, to pick up the lights and the mounting bracket. I landed at the airport and drove straight too his house to pick them up, he and his wife were very gracious hosts. The 9 th of March a big box arrived from Boba Christmas came early.
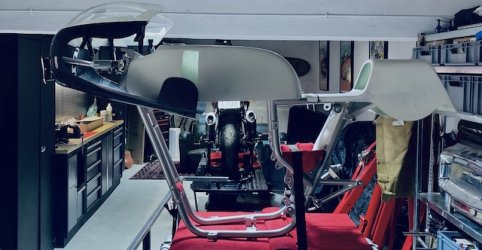
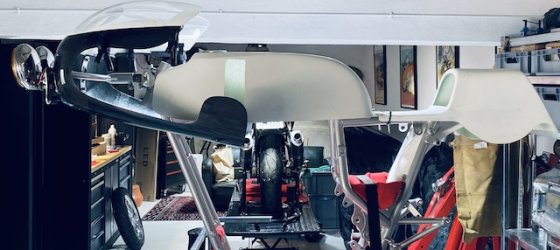
Once the frame got back from powder coating, It was get the frame on a bench and the tank and fairing mounted, and the seat etc. The tank was straight forward, nothing had to be done there, Enrico at Europlast supplied the fuel taps, along with a few other items I needed, ( http://www.europlastsucci.com) they are a great company, and very quick to answer. I have used them many times. They also supplied  my second screen in uncut format, the first one I had was from another company, I bought it cut and polished, but without knowing how many fairing types there are for  SFC's , ignorance is bliss, i know fairings and bike styling changes frequently, but like a kid in a candy store, my thoughts weren't straight when it came to the screen, and I wanted ease.  Getting a  pre  cut screen that fits a fairing straight off, is just going to be luck if you didn't get them both from the same supplier. Boba doesnt have screens, and that is why i looked elsewhere.
I talked a lot with Marnix in reference to the height of mounting for the fairing,  due to looking at hundreds of photos, the fairings from one bike to another  have been mounted high and low... I went with low medium mounting height, which meant I had to get clip ons, and not use the original bars. That tied in nicely with the new forks ( ordered later in the process)  as well, because they have adjustment, the original bars on the risers, wouldn't have allowed for easy fork adjustment. I bought Tommaselli Multi Adjustable clip ons, and Im glad I did, as I need all the adjustment I can get with the low medium mounted fairing. It will be an aggressive riding position to say the least, to stop the clip ons and clutch and brake reservoirs hitting the fairing when manoeuvring the bike in and out of tight spaces. The clip ons came from Discovolante, one of the few people to carry them in  stock, they gave a great service, and even answered their phone to me on a UK public holiday, I didn't know it was one, being in Spain. https://www.discovolantemoto.co.uk  They weren't the cheapest or the most expensive company to buy from, but they had stock, where as other companies that I tried to order from came back with long lead times , so I would definitely buy from them again.
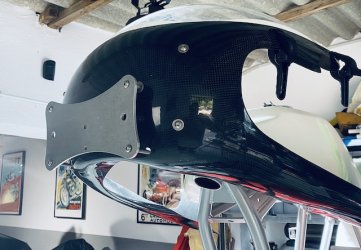
With the fairing mounted, next up was the head light bracket.... Alex from the forum,  got involved with the head light  bracket height. He took time out to give me detailed photos of his bike with Marchal headlights on, and rough measurements to where his mounting bolts  for the head light bracket were. I have said many times Im not a rivet counter, my bike isn't going to be 100% period correct, as I want a mix of modern and vintage aesthetics, but I think its worth the effort to make things look as though they are in the right place, and the head lights and fairing height need that attention. So with the fairing face masked up in  masking tape, I went about finding centre lines, vertical and horizontal so I could mark out where I would drill all the fastener holes. Im using standard double male- male  silent blocks for the upper mounts on the light bracket, and on the lower mounts I have used female - female silent block, M6 threaded bar and thick rubber spacers  cut to the curve of the fairing for a  nice fit and finish, as the lower mounts are fastened through a complex curved piece of fairing.
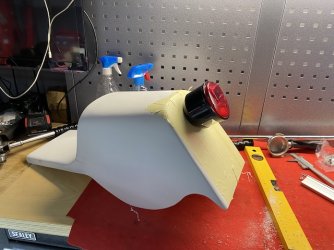
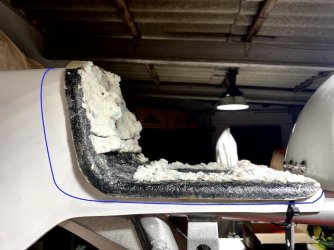
The seat unit I think is personal taste as to where it ends up, I left enough space for a tank rubber to pass unmolested between the seat and the tank, and called that good as far as my mounting points go. But I did skinny down the seat that came on the tail unit, it was a comfortable seat, but it just didn't look as I wanted it to, you can see in the photo the original profile it had from the purple outline I marked up in the photo, the end result is much more aesthetically pleasing .  I also found a new old stock CEV tail light with metal body, from http://www.vtmricambi.com  they have a great stock of classic bike lights , replica and NOS, the tail light is  what I consider to be so ugly and practical, thats its beautiful. I mounted it quite high, so you cant miss the rakish angle it sits on, I love it, its outrageous and to me  its beautiful. I have chosen Motogadget mo blaze pins for the rear indicators, https://motogadget.com/shop/en/m-blaze-pin.html  they are really well made and tiny. Not that it matters in Spain with classic bike licensing, they also carry CE type approval, which is pretty good given their size. These turn signals will make their way on to my other bikes now too. They are very subtle. I also believe in indicators even if people miss seeing  them  being used, I know I have shown people my intentions when using them. Damn I am starting to sound like a nana. . Front indicators will be mounted in the clip on ends these are the mo.blaze disc  https://motogadget.com/shop/en/m-blaze-disc.html  they were a christmas gift from my wife, she is Danish, so she practises the Scandinavian tradition of a gift each day until christmas, which means Im a lucky boy who gets 24 small gifts in the lead up to christmas, and as luck would have it she also bought my mirrors mo.view cafe,  again moto gadget https://motogadget.com/shop/en/m-view-cafe.html, she knows me too well, and those 4 items knocked out 4 christmas gifts.
The screen was a fun one to mark out and drill holes for, I wasn't looking forward to it, but I had a load of fun doing it. A friend is polishing the cut edges of the screen as that is his line of business.
So the bike is starting to take shape , and momentum is still in full swing.


 

Attachments

  • IMG_1968.jpeg
    IMG_1968.jpeg
    95.2 KB · Views: 421
  • IMG_1969.jpeg
    IMG_1969.jpeg
    148.3 KB · Views: 423
  • IMG_2103.jpeg
    IMG_2103.jpeg
    112.6 KB · Views: 417
  • IMG_3060.jpeg
    IMG_3060.jpeg
    118.8 KB · Views: 412
  • IMG_3495.jpeg
    IMG_3495.jpeg
    96.9 KB · Views: 407
  • IMG_3207.jpeg
    IMG_3207.jpeg
    105.4 KB · Views: 425
A few more pics during the process. Im not far off ,making these posts in real time now, as I haven't done too much more from here. The oil cooler is mounted. Next up is painting the tank and seat and fairing etc, and working on the electrical installation.
 

Attachments

  • IMG_3237.jpeg
    IMG_3237.jpeg
    107.7 KB · Views: 409
  • IMG_3234.jpeg
    IMG_3234.jpeg
    93.2 KB · Views: 401
  • IMG_3232.jpeg
    IMG_3232.jpeg
    167.1 KB · Views: 411
  • IMG_3208.jpeg
    IMG_3208.jpeg
    103.7 KB · Views: 404
Now Im writing in the present, mostly everything else I had written about happened over the past 6-8 months .
Last night I got in the shed with my youngest daughter being a spanner hand,  took off the tank, fairing and seat etc. Today they were picked up for going off for painting.
I should say in general I dont like orange as a colour, but these bikes are so iconic to me, especially the way that I am building mine, it just couldn't be any other colour.
That said I didn't want an SFC orange, or rather the coded/ral colour for that bike. My painter friend brought around the colour swatches for the  standard colour oranges they have available , and we decided on a custom or blended orange, he had about 150 different base orange colours to choose from , ranging from mustardy muddy orange through to tequila sunrise orange and everything in between. So we had a play around with some tints and came up with my Orange, 2 litres will be made, which should cover a few paint jobs. The orange sample photo here is a lot darker than what it really is, photos of colour samples just never translate well at all.  Everything will have 3 coats of orange, and then 3 coats of clear. The underside of the seat unit will be finished in satin black, along with the underside of the rear guard. I haven't decided what I will be painting the battery box / and electrical box yet, I think it will most likely end up orange as well, but that has to be finished and dry fitted first before I get to that . Normally these guys are painting 40-70 meter yachts, so Im quite lucky they are doing a small job for me. Im  designing the logos as vector files for the stickers  then another mate is printing them for me. Once on they will  then be clear coated over. Im not sure if I have mentioned , i am toying with the idea of making old school sponsorship stickers for all my friends companies that have helped me on this project, so it does have the appearance of an  endurance racer of the time. If it looks crap, the stickers will come off and I will just roll with a plain orange bike, but I think it could look quite good. I have been wrong before , so lets see.

All the painting should be back with me before the end of July, when most businesses close for a few weeks here for summer holidays. When its back I put up some pictures of what the finished product looks like.

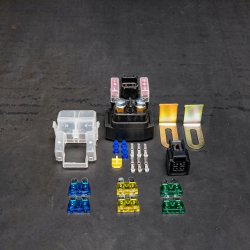
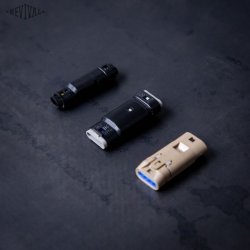
In the mean time, I have been working on the electrical side of things. Given the neat freak and minimalist I am,  its hard to find things that I think are well designed and appealing to use. As the bike is having the moto gadget blu unit  as the brains of the system, all of their wiring is quite small, so where  i need connectors I am using Mizu mini connectors ( they really are quite small, but they dont look it in the photos)  which are IP67, so they are pretty water tight. I didn't want to have a huge fuse box, nor could I find anything else I liked, and I hunted around for ages trying to find what I wanted. Revival cycles in Texas who do some nice builds have a great amount of info available on what they put into their bikes, and they sell a great fused starter solenoid, which is also water proof, and its small so I can hide that in my electrical box, that is now on its way to Spain from Texas. If you are interested in doing your own electrics for any builds, their tech talk videos  on you tube are pretty good . I mentioned before about hunting all over for the things I want, I first try europe, but never seem to find what I want. So for the regulator I am having one built by Ricks Motorsport electrics in the states .They build regulators that will charge and not damage both AGM or lithium batteries so you could start off with an AGM and change over later to a Lithium battery.  https://ricksmotorsportelectrics.com . Sounds extravagant or expensive or both, but its not, I have talked with the guys at Ricks, given them the spec I need ( spec supplied by Red) and the one they are building me is US $120.00. Its also with an inbuilt plug socket which is IP65, and it means I dont have a small pig tail of electrical cables coming out of it with bulky plugs on the end. I can make the cables the length I want and plug them straight into the regulator.  For the battery Im looking at something like the Antigravity ATX20 RE-START Battery, It comes in at 1.6 kgs, which is a massive weight savings,  and it's size isn't that bad either for the 20 amp hours  and 680 cranking amps that you get in it.  6.89 x 3.5 x 5.12 in (mm: 175 x 89 x 130) . I could go smaller but this seems like a good size  I have an Antigravity 4 cell battery on my Morini 500 which works really well. I ditched the starter motor on that and kept it as a kickstart, and the battery has lasted really well. So Im very happy with the brand. You can get these batteries in the UK now, https://www.antigravitybatteries-uk.co.uk/re-startoem-batteries/antigravity-atx-20-re-start-battery.html or from their website in the states. They are on the higher price end, but they work.

thats about it for now


https://revivalcycles.com/motorcycle-videos/playlist/Revival%20Cycles%20Tech%20Talk


Attachments

  • 234fe32b-7f8a-4906-9456-101032a2b6cf.jpeg
    234fe32b-7f8a-4906-9456-101032a2b6cf.jpeg
    15.2 KB · Views: 325
  • IMG_3802.jpeg
    IMG_3802.jpeg
    159.8 KB · Views: 337
  • Starter solenoid.jpg
    Starter solenoid.jpg
    146 KB · Views: 339
  • Mizu_P25_-_23_and_4_pole_connectors1_Revival_Cycles__94086.1531539355.jpg
    Mizu_P25_-_23_and_4_pole_connectors1_Revival_Cycles__94086.1531539355.jpg
    30.4 KB · Views: 341
I believe its 40 AMP, they supply the kit with 10, 15, 20 and 30 amp fuses. They suggest 12 AWG wire for the connection to your regulatior. Im using 16mm2 or 5 AWG wire from the battery to the solenoid circuit and then on to the starter motor. I have this piggy backed onto my Ducati 750 SS, and its insane the difference it has made for starting the Ducati. For a bike that didn't like to start first press of the button, it does every time now on the first press of the starter button. In their tech talk video they show how to wire it up for moto gadget users and for non moto gadget systems.

I think they do a great job of coming up with good kits for doing your own installation, if you dont know where to get the parts you want, and their prices aren't outrageous, and I like supporting them as they took the time to share some knowledge

https://www.youtube.com/watch?v=GvcV3J_kS3I

here's a handy link for wire gauge conversions https://www.rapidtables.com/calc/wire/awg-to-mm.html
 
Revival Cycles don't specify the current rating of their starter relay, but it would be way more than 40 Amps. Starter motors typically draw over 100A. They need as high a voltage as the system can deliver to work properly, so minimising voltage drop in the connecting cables is important. You need the largest cable you can practically use. 16mm2 cable to the starter motor is a bit skimpy in my opinion. I'd go for double that size (AWG 2) if you can physically fit it onto the bike.

The Revival Cycles starter relay looks like a nice bit of kit. They've obviously put some thought into the product and the support info that comes with it.
 
Dellortoman said:
Revival Cycles don't specify the current rating of their starter relay, but it would be way more than 40 Amps. Starter motors typically draw over 100A. They need as high a voltage as the system can deliver to work properly, so minimising voltage drop in the connecting cables is important. You need the largest cable you can practically use. 16mm2 cable to the starter motor is a bit skimpy in my opinion. I'd go for double that size (AWG 2) if you can physically fit it onto the bike.

The Revival Cycles starter relay looks like a nice bit of kit. They've obviously put some thought into the product and the support info that comes with it.

Great comments. Thanks for putting me straight. I could certainly go up in wire size. 

Thanks again
 
A triple starter motor can pull 170 amps. Think 2AWG is way over spec and impossible to route neatly due to its bulk. You'll also struggle to get ring terminals to fit that gauge and your solenoid terminals. I disagree with Cam - 16mm2 is a good compromise.
 
Love the Bol d'Or look! Keep posting pics as it motivates the group to wrench & ride! Nice workshop as well-
 
Rob said:
A triple starter motor can pull 170 amps. Think 2AWG is way over spec and impossible to route neatly due to its bulk. You'll also struggle to get ring terminals to fit that gauge and your solenoid terminals. I disagree with Cam - 16mm2 is a good compromise.

Wouldn't be the first time I've been disagreed with. :D

But you're probably right that 2 AWG is a bit over the top. Perhaps 3 AWG is a better choice. 

My Jota came with starter and battery cables that were about 16mm2. I presume they were factory original. One day when the bike was being a bugger to start, I put my hand on the starter motor cable after cranking the starter and it was quite hot. Hot enough to make the plastic insulation sheath feel quite soft and squishy. If I'd kept cranking the starter I reckon the cable insulation would have turned into smoke. So I replaced the starter and battery leads with welding cable that were about 28mm2 (approx. 3 AWG). There was a noticeable difference in starter cranking. Once I'd sorted the issue that was causing the poor starting in the first place, the bike cranks well and starts easily, and the cables never get hot.  Welding leads are quite flexible, and there was plenty of room to route the cables.

I did the same thing with my Benelli triple because its starting system was barely up to the job (1130cc high compression engine with a pissy little starter motor). The larger cables were a bit more of a challenge to fit on that bike because everything is packed in a lot tighter than on the Jota, but with a bit of re-routing stuff it all fitted. It made life easier for the starting system.
 
Is the ND .95hp starter on 750s gruntier (ie draws more amps) than the triple? I've never had an issue with the std starter cable on an SF.

I think the relay that mob sell looks VERY similar to the one I bought off the wreckers from a big Japanese bike - I went back and scored the waterproof plug for it later as well. The std SF one has done 45 years of work (well, a few years off the road  :D ) and never failed me. i'll use it on bike #2 when I build it.
 
John Wilson did the welding cable mod to my bike as well years ago.
Even he did some things I didnt like, he liked to use super-thin control wires in his EI, yes they did the job of sending signals but they were so thin that they were easy to brake and a pain to reconnect if broken.
 
Back
Top