Building my Jota

So Its been a while, work has got in the way, and I am waiting on a few supplies to arrive.
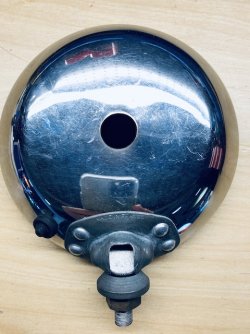
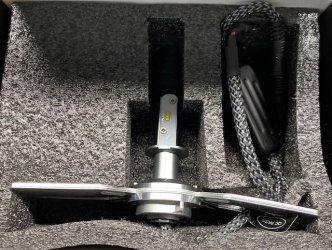
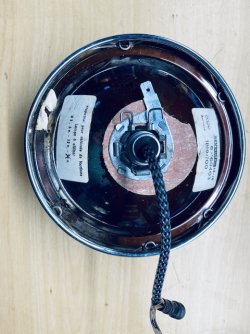
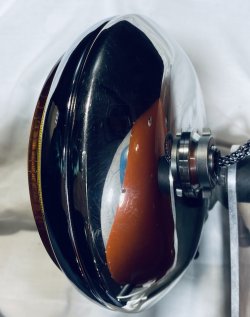
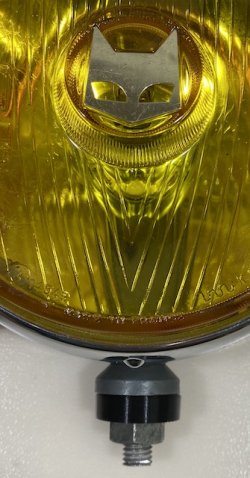
This week I finally tackled retro fitting the LED bulbs into my Marchal spots. I thought that this would be a shocker, but by luck I helped myself out and bought out of a choice of two bulbs in the brand I settled on, the right H3 led bulbs that easily fit my spots. I decided I had to drill a hole in the buckets of the spots to allow the light bulb to fit.. Even though the LED's are H3, they are 28mm longer in length. The actual bulb length is the same, so there is no issue there with sitting it in the holder, but the spot bucket wouldn't go on over the extended length. I pulled the bulbs apart and took off the heatsinks, when  I bought the bulbs I dint know you could do this, so this was a stroke of luck. This allowed the original spring clips to hold the bulb in place as per the original one, with a bit of wiggling to get the spring clip down each side of the bulb. I drilled centre holes in the bucket of 20mm ID, so the back of the bulb and the wiring could pass through, and then I used the heat sink assembly and spacer to tighten down onto the back face of the bucket, so the bulb is now anchored at by two points. By having the bulb fastened to the bucket, the bucket now acts as the heatsink for the bulb, albeit with a large surface area.  The back of the bulb is sealed with a rubber bung, which I have added some sealer to, so there is no chance of water getting in the bulb circuit. I printed off some silent block rubber in TPU95, with an infill of 30%,  to add  to help with vibrations you can see one in the last photo on the threaded section of the mounting bolt. Where the spots attach to the aluminium mounting plate, which in turn is silent blocked onto the fairing. I think the out come looks pretty good, and not too out of place with the wires exiting the back in the centre.
The bulbs supposedly have a high and low beam function

Heres a bit of a blurb on them
Producing high-performance pure white lighting thanks to the Premium LED chips and the chrome reflectors that compose them, the adjustable H3 LED bulbs for low beam, high beam and fog light will be able to adapt to the most limited in space headlight optics. Their 360? directional heat sinks are composed of aluminum slats that can be easily "modeled", they will find their seats by adjusting perfectly to the constraints of each optics.

The H3 adjustable LED bulbs are anti OBC error, the connection is "plug and play", so there is no change to provide, you simply replace your original halogen bulbs with adjustable H3 LED bulbs.

Characteristics:

- 8000 Lumens for a pair of H3 LED bulbs
- 6 leds PREMIUM per H3 bulb
- Lighting Color: Pure White 5500K
- Materials: Aviation aluminum
- Intensity: 12V and 24V
- Operating temperature: - 40? C to 300? C
- CE Standards
- Cooling: Aluminum passive heatsink
- Dimensions bulbs H3: 65 X 35 mm

you can buy them here, they offer a great service
https://www.ledperf.eu/h3-led-car-bulbs-adjustable-p-34721.html
 

Attachments

  • 1.jpeg
    1.jpeg
    140.2 KB · Views: 329
  • 2.jpeg
    2.jpeg
    195.2 KB · Views: 321
  • 3.jpeg
    3.jpeg
    135.8 KB · Views: 322
  • 4.jpeg
    4.jpeg
    98.4 KB · Views: 310
  • 5.jpeg
    5.jpeg
    109.1 KB · Views: 319
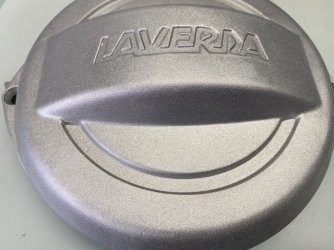
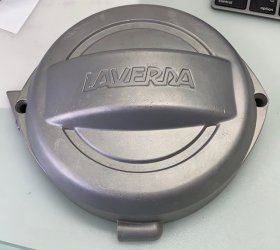
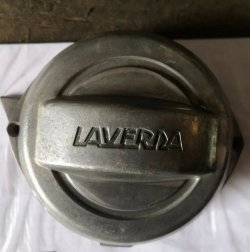
I also spent a bit of time organising my "new to me" alternator cover, that I picked up in Italy, Miguel (Michipons ) on the forum, put me in contact with a glass bead blasting company that he uses , for an impressively quick turn around on cleaning up the cover, after they cleaned 40 odd years of patina off it and did a great job, it showed up a few grazes and wounds, not super bad, but with the engine being built by Red, I needed to get the cover as good looking as the engine is going to come back. Enter Ru, a mate of mine who amongst other things being a yacht rigger, he is also an expert metal finisher, most people are proud to say they aren't gynaecologists but the will have a look anyway, but Ru is an amazing metal finisher and polisher in his spare time. He rather timidly started to polish the marks out with 400 grit paper, and then ripped into it with 240 grit and started making real progress. Then he completely polished the cover to a mirror finish and blasted it again to a satin finish, the cover came out completely stunning, and I now owe hime 3 hours of 3d printing... a pretty fair trade I think! 
Photo one shows how the cover arrived, in pretty good, nick and worth the 100 euros I paid for it
photo two is after the first clean up
photo 3 is after Ru worked his magic
 

Attachments

  • 3.jpeg
    3.jpeg
    140.1 KB · Views: 324
  • 2.jpg
    2.jpg
    75.5 KB · Views: 325
  • 1.jpg
    1.jpg
    79.2 KB · Views: 314
Paul Marx said:
I admit not liking that freshly bombed finish.

I polish mine up by hand with wire wool and an aluminium cleaner.

Paul

That?s all good.  Each to their own.  I suspect you won?t like how my engine looks either.  🤣🤣🤣🤣🤣
 
sideshow said:
That?s all good.  Each to their own.  I suspect you won?t like how my engine looks either.  🤣🤣🤣🤣🤣

Probably not.

The Faemina is on the living room table waiting for me to do something with it.
Ie, get the piston out.

Paul
 
Paul Marx said:
Probably not.

The Faemina is on the living room table waiting for me to do something with it.
Ie, get the piston out.

Paul

get the piston out then ! if you need the piston sleeve tool let me know, you can borrow it.
We got a mates Cimbali , same age as yours, going the other day, it makes a neat wee cup of espresso
 
sideshow said:
get the piston out then ! if you need the piston sleeve tool let me know, you can borrow it.
We got a mates Cimbali , same age as yours, going the other day, it makes a neat wee cup of espresso

Very many thanks for that.
I need to get into the tutorials again.

Paul
 
chrisk said:
I rather like the raw look Todd. But, if I were to do a triple engine, it?d be black.
Reds black race engine is so sexy...... IMHO.

yup... I still have two engines to go yet.... maybe black will make an appearance
 
sideshow said:
yup... I still have two engines to go yet.... maybe black will make an appearance

When it does you will be in luck as it should stick to that primed surface very well... :-X :-X
 
AndyW said:
When it does you will be in luck as it should stick to that primed surface very well... :-X :-X


:LOL: :LOL: :LOL: :LOL: :LOL: :LOL:, well the Jota engine is as smooth as glass... nothing will stick to that. The picture of the alternator cover doesnt show how smooth it really is... pictures paint a thousand words.... but feel adds a different dimension.
The 1200 engine... thats another story.... the condition its in, it would be like trying to get shit off a blanket
 
A small amount of progress..... the jobs to do list seems to be growing bigger, while the jobs that get done list doesn't seem to go as quickly as the to do list!
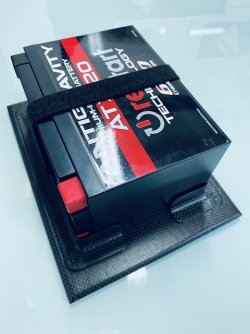
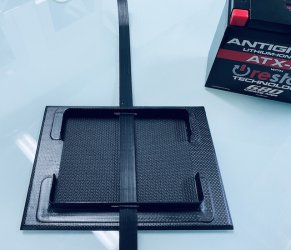
Finally the battery tray is finished. Originally I wanted the battery down low, on the horizontal, the battery would have been no higher than the bottom of the original battery base, eg hidden in the nether regions of the frame,  below where the original battery used to sit, and out of sight, but I was concerned about chain clearance... something I hadn't thought about , until some forum members rightly observed it could be an issue. So I moved the battery to sit in the space behind the seat. As the battery is only 1.7kg, the weight wasn't an issue hiding it in the hump, and it solved a few other minor problems too. So here is the tray in all its glory. I will use 3M dual lock to stick the tray in the seat hump, so the tray can be removed for what ever reason, the battery strap needs to be better than the velcro I have in there now... thats on the to do list, but it gives you an idea what a neat solution this is.Big ups to my mate Aussie Nipper, who did the carbon work, after we spent a few hours working out what we wanted to build.
 

Attachments

  • IMG_5394.jpeg
    IMG_5394.jpeg
    99.5 KB · Views: 453
  • IMG_5396.jpeg
    IMG_5396.jpeg
    121 KB · Views: 454
One more piece of the puzzle has been finished, a Huge thanks to Red for the engine.... I just cant wait to get it back and in the frame.
I know everyone knows him so well from here and the other forum. For those that haven't been lucky enough to have their engine worked on by Red, I can say my experience has been amazing. He has always answered mails promptly, he has put up with my ignorance and probably a bunch of daft questions. I know there are other guys out there, but I chose Red, and I would go back to him time and time again at the drop of a hat. Frequent photos and reports on the work that has been done have been very forth coming, in great detail, and in good humour. Im told Im a difficult, demanding and impatient person, and that I have expectations that are too lofty when I spend money on things, Red is one of the few people that has actually delivered beyond my expectations. Its good to know there are blokes like him about. Now I just have to talk him into doing a twisted  750 engine for me......


https://youtu.be/3J2Xhdf8xS4


I hope you enjoy this as much as I will
 
Back
Top