Building my Jota

chrisk said:
Hey Todd. The polished cases look to have had the non polished finish you like, or is just my poor eyesight.

Your eyes aren?t deceiving you ... I?m not much for shiny things, I really don?t like chrome and highly polished gear ,  the satin/ Matt finish is what I like.  That said the wheels for the time being are shiny spoked wheels
 
TC said:
Thanks for sharing Todd
(bigthumb) (Lavflag)
That engine will just get better and better.
cheers
Tom

Anytime! It?s going to be a very good day when the engine is running in the frame , that will be another good video to watch. I will have two  different exhausts to try
 
Its a wiring week this one,

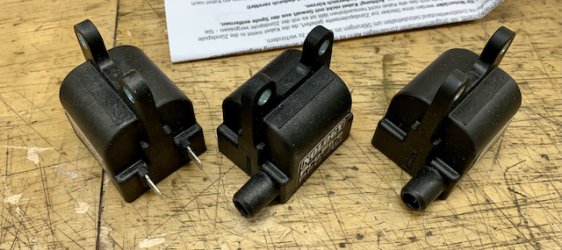
first up, my Nology coils arrived from Germany. Im rolling with 3 single coils
I used Peter Hackner from http://www.nology-zuendsystem.de/ he gave great service, with quick dispatch and delivery, he had the items in stock, and was super easy to deal with , from my experience I highly recommend him, I talked with him on the phone and mailed him.

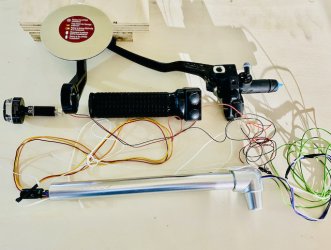
Today was starting to wire up the switch gear, I started with the  left hand clip on first, Im using all the gear from Moto Gadget... I know Paul... not your cup of tea  8). This will keep the installation nice and clean, and  finally I get to use my last year christmas presents my wife gave me! One thing that makes the wiring easy and a little tricky is the MO.button , its uses bus technology to send all signals via one thin wire to the mo.unit. This makes the wiring loom easy. The tricky part is stuffing all the wires you need to inside the clip on, but with patience its possible, as the wiring is very small diameter.  In the picture below I need to run the earth wires for the 3 switches. on the the left , I am having horn, head lights, left and right indicator  I only have 3 switches there but if you do a short tap on the indicator button you can set the system up so say the right indicator starts, and a long tap would start the left indicator, you can have it so the indicators turn off after a desired period of time, so only one button is needed . The bar end indicators finish it all off nicely  The right hand clip on will have the starter, the kill switch and the screen scroll button for the chrono classic rev counter with a small lcd display in it for speed, trip meter and oil temp etc
When wiring in the mo. button  the trick is to get all the wiring almost in place, or at least moused through the holes it needs to go through, and then slide the mo. button inside the clip on, as you gently tae up on the wiring that becomes slack as the button slides in. I drilled a 5mm hole in the clip on bar where the switch wires come out under the switch, and I drilled a 6mm hole in the end of the clip for them to exit , Im going to attempt to cover all the wires with dyneema cover braid to protect them and make it all nice and black...watch this space to see how and if that works out..... I did this system on my Morini 500 but used heat shrink over the final wiring, the dyneema cover will look a lot nicer. You only need one mo.button, I always put it in the left hand clip on. The clip on tube shields the circuits inside the button from "emi " interference from the coils, spark plug caps and leads etc.
The right hand clip on is much easier to wire up as there is no button needing to be placed  inside the tube.

I posted a link for Revival cycles in Texas, who have been a great help to me with certain parts and some knowledge, they do ship to Europe, they would be a no brainer to buy from in the states, a nicer bunch of blokes couldn't be met elsewhere, and for people like me who work better from pictures and videos rather than from reading words, it makes everything seem easy and logical, and then I feel less of a dumb ass....

here is there explanation on the mo.button
https://youtu.be/HNQKT1gcxY4


Attachments

  • 6A195240-3628-4725-A11C-0186B09FA238.jpg
    6A195240-3628-4725-A11C-0186B09FA238.jpg
    106.1 KB · Views: 215
  • IMG_5520.jpeg
    IMG_5520.jpeg
    125.1 KB · Views: 215
Wooohooo, my engine is on its way home from down under , to back up here!

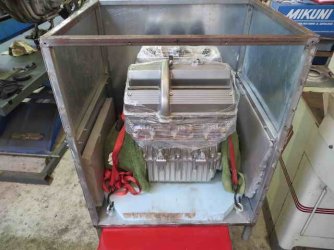
The first shot is my box that I built for shipping, Red kindly modified it to put tie down points in it... I have to say when  I built it, i just slammed the engine in there with a bunch of foam. The engine was in a state when it went.... I did'nt even try to to start it

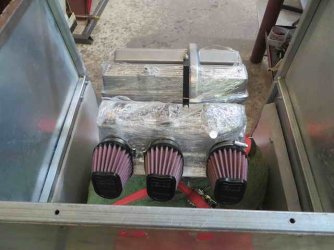
Photo 2, just cant get enough of that view of the filters on the carbs

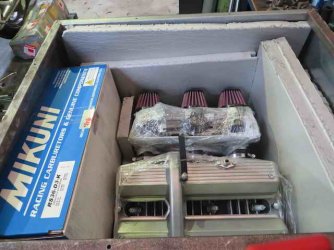
Photo 3, all packed in, it really will be Christmas this year

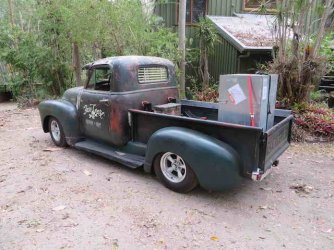
Photo 4, The box got the royal treatment with delivery in Reds hot rod truck to DHL.

A huge thanks to Red.... he goes above and beyond. I really feel very lucky that he took time to build my engine.
 

Attachments

  • 1.jpg
    1.jpg
    34.9 KB · Views: 170
  • 2.jpg
    2.jpg
    31 KB · Views: 171
  • 3th Dec TC engine crate 4.jpg
    3th Dec TC engine crate 4.jpg
    36.5 KB · Views: 178
  • 4th Dec TC engine loaded.jpg
    4th Dec TC engine loaded.jpg
    45.9 KB · Views: 179
I'm really enjoying this 'let's think outside the box and do something different' thread. Thanks for taking the time and positing the photos.

It's reminiscent of the early days of the forum when we were discussing all sorts of weird and entertaining shit. Since those days we seem to have gone through a 'standard is perfection - does anybody have the OEM part number for this circlip' phase. I enjoy it all, but especially the update/ improvement stuff.
 
Haggis said:
I'm really enjoying this 'let's think outside the box and do something different' thread. Thanks for taking the time and positing the photos.

It's reminiscent of the early days of the forum when we were discussing all sorts of weird and entertaining shit. Since those days we seem to have gone through a 'standard is perfection - does anybody have the OEM part number for this circlip' phase. I enjoy it all, but especially the update/ improvement stuff.

👍
 
Haggis said:
I'm really enjoying this 'let's think outside the box and do something different' thread. Thanks for taking the time and positing the photos.

It's reminiscent of the early days of the forum when we were discussing all sorts of weird and entertaining shit. Since those days we seem to have gone through a 'standard is perfection - does anybody have the OEM part number for this circlip' phase. I enjoy it all, but especially the update/ improvement stuff.

thanks mate, its nice to hear. Im trying to show how stupid I am as well with mistakes I make, and I have to say there are a bunch of people around the world from this forum who get whatsapp messages, at all hours of the day,  from me asking for help when I am stuck, In particular Q, and they are always answered thankfully, and remarkably from my "dumbass I dont know a thing questions", I dont think there is any eye rolling going on from the people answering and setting me straight. And lets just say Red had a lot of patience with me too 8)

 
AndyW said:
Is that a small truck or a BIG engine? :o :o  both look great!! 8)

I might have gone overboard building my box! I put legs on it so fork lifts could lift it easily, so It wouldnt need to travel on a pallet... I think finally it did get put on a pallet
 
Jo said:
Wow - great pics!
(goodjob)

I imagine that you kind of jittery for the time you've to wait now ...
(clock)  8)


I have been jittery since it left ! It should be here next Friday, so the plan is to have the engine in and running before Christmas .... lets see
 
Incredible tale - the engine leaving Red's shed in the steel box on the hotrod pic is pure gold! Can't wait to see pics of it fitted in the frame and the startup vid, Todd. Bewdy!
 
Piranha Brother 2 said:
Incredible tale - the engine leaving Red's shed in the steel box on the hotrod pic is pure gold! Can't wait to see pics of it fitted in the frame and the startup vid, Todd. Bewdy!

thanks for all your help Q, a lot of this wouldn't happen or go as smoothly without your input too mate... Im glad there are crazy buggers like you with the SFQ that understand the need for not leaving it standard !
 
What oil cooler are you going to run?  Just found the oil leak on the six plug racer, Suzuki alloy cooler cracked through, even though it is rubber mounted. 
You ride them, you fix them.......

Weighed it just out of interest, almost a third of the weight of the original steel one.
 
martymoose said:
What oil cooler are you going to run?  Just found the oil leak on the six plug racer, Suzuki alloy cooler cracked through, even though it is rubber mounted. 
You ride them, you fix them.......

Weighed it just out of interest, almost a third of the weight of the original steel one.
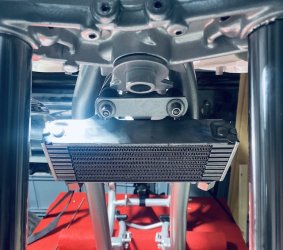
I have a new Ali one from a Citroen 2cv, Im not sure if thats the best one to use, but ist what I have for the moment, I havent got around to asking Red , or anyone else what they think should or could go there


Attachments

  • IMG_3640.jpeg
    IMG_3640.jpeg
    118.2 KB · Views: 245
Back
Top