Stripping my Series 1 Jota engine

No worries Clem  just recall found it even more tricky your way..seem to recall tricky to get the chain to meet up over the cam sprockets in the desired place..may be wrong as was a few years ago! And one of your timecerts aint straight btw, so will be redone😉 maybe.
 
tom3c75 said:
Gently Bentley when separating the cylinder head from the barrels.
The front plastic cam chain guide often breaks at the locating pegs (top or bottom pegs, can't recall).
Item 40 on the attached PDF parts list.

Tom

Wouldn't that be changed as a matter of course?

Paul
 
TheWrongTrousers said:
Sounds like I may have to add that to my growing list

At least that one.
You need to lift the head to get to it.

The cam chain tensioner blade can be changed when the cam cover is off.

Paul
 
And don't forget that last nut on the underside of the head in front of the front tensioner.. makes all the difference  :D,  I used some soft wooden  wedge  shims  to apply some steady pressure between head and  barrels whilst tapping with the rubber mallet.
 
If you're going to go with Paul's advice and use a rattle gun (electric or pneumatic) you will need an extra long 38mm socket for the nut behind the alternator, they're a bit hard to find. I recommend just looking for Grey Pneumatic 2036XMD on line.
Pretty hard to do without a rattle gun, in fact.

Ken
 
mcnicol said:
If you're going to go with Paul's advice and use a rattle gun (electric or pneumatic) you will need an extra long 38mm socket for the nut behind the alternator, they're a bit hard to find. I recommend just looking for Grey Pneumatic 2036XMD on line.
Pretty hard to do without a rattle gun, in fact.

Ken

36mm...

Probably easier to make one than to buy.  Cut up a 1/2" drive socket and weld a length of fork stanchion between the bits.  I made a couple 30 years ago, still in daily use. :D

piet
 
mcnicol said:
Oops. Part number's right, though. Got it here in my hand.

Ken

This is the one, right Ken ?

https://gb-jbtools.glopalstore.com/grey-pneumatic-2036xmd-1-2-drive-x-36mm-extra-deep-socket/?utm_campaign=pr_r&utm_source=https://www.jbtools.com/&utm_medium=wi_proxy&utm_content=en_US&utm_term=a
 
Not certain that the commercially available long sockets will work because they won't allow the crank end through. They are obviously thicker than 36mm along the shank.

The ideal way would be the factory way, block the crank using the woodruff key and a 36 mm spanner on the nut.

Since I was in the same situation last week, a box spanner was suggested, ordered and paid for but not received yet.

You can also try to use the alternator to block the crank with the lh 32mm crank end nut whilst you undo the 36mm nut turning it clockwise, or use the two small holes on the alternator plate to block the crank.

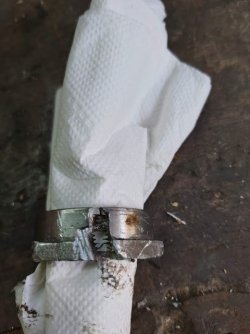
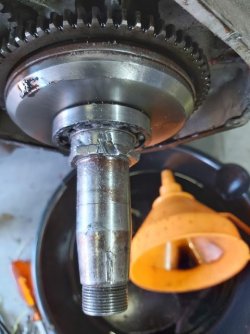
The nut on my engine wouldn't move so I ended up cutting out the oil seal behind the nut and using a grinding tool on a Dremel to cut the nut without damaging the thread on the crank. Rather extreme, but it's off and will proceed with measuring valve caps today so as to take the head off.

Paul
 
Paul Marx said:
Not certain that the commercially available long sockets will work because they won't allow the crank end through. They are obviously thicker than 36mm along the shank.

The ideal way would be the factory way, block the crank using the woodruff key and a 36 mm spanner on the nut.

Since I was in the same situation last week, a box spanner was suggested, ordered and paid for but not received yet.

You can also try to use the alternator to block the crank with the lh 32mm crank end nut whilst you undo the 36mm nut turning it clockwise, or use the two small holes on the alternator plate to block the crank.

The nut on my engine wouldn't move so I ended up cutting out the oil seal behind the nut and using a grinding tool on a Dremel to cut the nut without damaging the thread on the crank. Rather extreme, but it's off and will proceed with measuring valve caps today so as to take the head off.

Paul

The locking handle is all good and well, but the nut can only be accessed inside the alternator housing with a cranked ring spanner.  Holding the handle with one hand, and trying to loosen the (sometimes very tight) nut with the other, often results in in slippages, scathed knuckles and a lot of swearing... and a knackered nut to boot!  The handle would also need to be properly tightened on the crank to avoid shearing the woodruff key (easier than you might imagine!) and pulled off afterwards.

Long socket and rattle gun, easy as.  15 painless seconds, off, and back on.

piet
 
I have a 36mm socket that fits BUT as i think Clem pointed out, not easy to use manually because of the leadin chamfer or whatever its called,  which results in less grip on a thin nut. Clems box spanner worked for me, flimsy though they look😉 so keep on looking out for Monsieur Postman Paul!
 
Don't worry Nick, it'll come in handy for the rebuild.
The nut has been dealt with.

Paul
 

Attachments

  • 28 4 20 2 (Petit).jpg
    28 4 20 2 (Petit).jpg
    56.6 KB · Views: 134
  • 27 4 20 4 (Petit).jpg
    27 4 20 4 (Petit).jpg
    70 KB · Views: 133
Back
Top