wanted - moto giro bike

I'd lean towards grinding / buffing / cutting / sanding all the damage out, up to the point before which you'd start polishing, then send them back to the blaster to get the nice matte finish again. The blasted finish will hide more blemishes than polished, so if you can get them to the point of being viable to polish they should subsequently look great re-blasted.
Something about sandcast finish cases and polished covers, you know it looks so good. Polished is going to look a bit 'chav' (as I think the poms would delightfully put it). Like it should be lowered till it scrapes the ground and have a doof-doof stereo and led blinking lights or summat. :D
Hi Steve

I am converting from 6 volt to a more modern 12 volt system just so I can run a doof-doof stero, hopefully enough pulsing bass to help push the bike up the hill.....

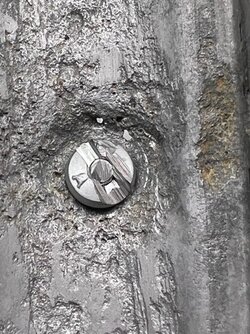
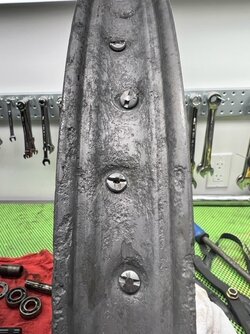
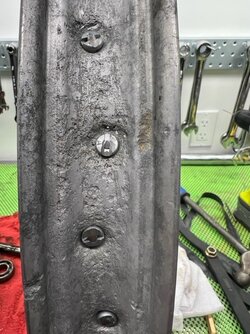
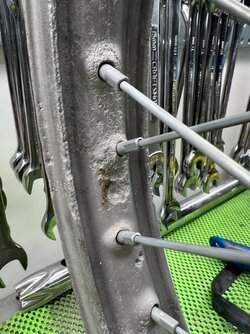
seriously though, after vapour blasting revealed all the faults and corrosion hidden under the grime of both the engine cases and the wheel rims, I am going to have to do something.

Not even sure the rims are salvagable, the vapour blasting revealed some cracks in the rims, going to take the rims to the same welder who I am going to use to do the engine case repair and see if he thinks he can make the rims safe, otherwise I will have to source new rims. I hate wheel building. Last spoke wheel I built was years and years ago for the 71 SFC 750 front when I added the fancy four leading shoe brake, I fretted for hours and hours trying to get the wheel spoking absolutely perfect, I suspect builidng a spoked wheel is an art I do not possess.
 
An old builder I worked with years ago had some choice sayings like "If it doesn't fit, get a bigger hammer"
Another of his was "If it doesn't look right, paint it"

Perhaps you could tidy up the crankcase halves as Steve suggested, then paint them matt black. Black engines with a few polished bits on them look pretty cool.
 
had a good look at the vapour blasted wheels and hubs while taking the wheel bearings out this afternoon. Three of the four wheel bearings were seized solid, for a start. Not the real issue though, with decades of dirt and grime removed from the wheels by the vapour blasting, the rims are so porous you can see through them in spots. The spoke adjusters are all seized solid, couldn't get even one to loosen.

Looks like I need a good source for shouldered 19 inch 36 hole rims, and spokes to suit. I know absolutely nothing about sourcing approriate length spokes, other than maybe just measuring the existing spokes when I start cutting them out, bloody hell. Any suggestions for sources of rims and spokes? I had obtained 18 inch shouldered reproduction rims for the Garelli from a company in the U.S., likely Chinese made, and I will have a look at my records to see where I got them from, but open to any source?
 

Attachments

  • rims 1.jpg
    rims 1.jpg
    139 KB · Views: 26
  • rims 2.jpg
    rims 2.jpg
    99.2 KB · Views: 25
  • rims 3.jpg
    rims 3.jpg
    107.6 KB · Views: 27
  • rims 4.jpg
    rims 4.jpg
    113.6 KB · Views: 27
Apparently Buchanans is the go-to place in the US. Try to save an example of each type of spoke, ie, inner/outer, left/right, front/rear wheel if they are different, as a specimen for them to replicate. If you have to resort to cutting, measure overall length beforehand. State hub size/spoke flange diametre so the rims can be drilled correctly. Should be easy-peasy. One source for rims in Europe is Motocicli Veloci in Italy, they can supply flanged Borrani rims in many shapes and sizes.

piet
 
Hmm ... yes. Those rims are beyond salvation. They look like they've been used as a sacrificial anode. I hope the hubs are in better condition.

I'd follow Piet's advice if you're going to do it yourself. But if, as you say, you're not confident about tackling the wheel lacing job yourself, just farm the job out a competent motorcycle wheel builder and let them sort it out. I'd not heard of Buchanans before, but looking at their website, they appear to have it all covered, including Borrani rims.
 
other than 3 of the 4 wheel bearings having been seized solid, both hubs are in great condition. They cleaned up really well in hte vapour balsting and look like they should polish up well. Believe it or not the Gilera rims looked useable BEFORE the vapour blasting cleaned off decades of crap. I have never seen aluminum corrosion like that before, didn't even know it was possible. Now looking for a wheel builder. When I was building the Garelli I remember checking with Buchanan's and getting a quote for two wheels in an amount greater than I paid for the Garelli itself, then it became a non issue when the Garelli got damaged in the garage fire.
 
There is Woody's Wheel Works in Colorado, full service and apparently highly recommended. if you building yourself the best supplier of rims and bits is Cental Wheel in the UK. I would be very careful getting new rims drilled unless you are sure they have the correct specs. That can go bad from a distance easily. I can feel your pain Paul about huge hubs and short spokes but these should be much easier.
 
I am converting from 6 volt to a more modern 12 volt system just so I can run a doof-doof stero, hopefully enough pulsing bass to help push the bike up the hill.....
Please tell me you are going negative earth. It will make life much easier, particularly when you install an Ignitech (!!!). I am assisting a friend to install an Elektronik Sachse ignition on his Velocette Thruxton. It has already been changed from 6V to 12V with an electronic regulator, but he chose to remain with +ve earth. Is a right pain to mount the ignition box, I am still struggling with this.

cheers,

bazzee
 
recomended to me earlier in this thread https://www.vape.eu/gilera. I have just assumed it will be negative ground. Very thorough bunch. I ordered and paid several weeks ago, still going back and forth with thei tech department confirming measurements, crank diameter and crank taper, various clearances, yesterday they wanted me to confirm direction of engine rotation and I couldn't answer that as the engine is totally apart and I didn't pay attention before I took it apart......
 
Do I see an idler/intermediate gear between the crank and the gearbox mainshaft ? Layshaft is below so mainshaft with clutch and final drive sprocket on it must rotate forward.
If there's an idler - hard to pick from photos - then the crank rotates forwards. If no idler then it has to rotate backwards.

Quite a few I talian lightweights with gear primaries ,and a direct top gear rotate backwards.
 
Do I see an idler/intermediate gear between the crank and the gearbox mainshaft ? Layshaft is below so mainshaft with clutch and final drive sprocket on it must rotate forward.
If there's an idler - hard to pick from photos - then the crank rotates forwards. If no idler then it has to rotate backwards.

Quite a few I talian lightweights with gear primaries ,and a direct top gear rotate backwards.
I see no idler.
 
Please tell me you are going negative earth. It will make life much easier, particularly when you install an Ignitech (!!!). I am assisting a friend to install an Elektronik Sachse ignition on his Velocette Thruxton. It has already been changed from 6V to 12V with an electronic regulator, but he chose to remain with +ve earth. Is a right pain to mount the ignition box, I am still struggling with this.

I'm rebuilding (my Dad's) Velo Thruxton at present and have totally junked the entire electrical system. The bike already had a 12v conversion in the 70's, but I suspect was still positive earth, but it always ran the magneto so it was only really lights and a horn. Retaining +ve earth in light of using modern equipment sounds like a great way to make life more difficult than required!
I have minimal interest in messing around with the original equipment which barely worked when new. :) I've gone 12v neg earth, SSB AGM battery, new wiring harness made to suit with 4x blade fusebox, ignitech ignition (Laverda content - I modified a redax Lav 180 pickup to suit!) and (for the moment) the Alton alternator/regulator that Dad had bought many years ago but not used. Those (early) Alton units have a very poor reputation so if I have problems I will get the Kubota tractor alternator conversion done by the chap in Melbourne. Headlight is a H4 semi-sealed beam replacement, with LED globe and LED taillight globe, both of which should reduce the load on the electrical system. I've ordered one of those Sparkbrite voltage monitors which will hopefully give some warning of impending doom and not be too noticeable. All modern gear with 12v -ve earth, nice and easy!
 
had a good look at the vapour blasted wheels and hubs while taking the wheel bearings out this afternoon. Three of the four wheel bearings were seized solid, for a start. Not the real issue though, with decades of dirt and grime removed from the wheels by the vapour blasting, the rims are so porous you can see through them in spots. The spoke adjusters are all seized solid, couldn't get even one to loosen.

Looks like I need a good source for shouldered 19 inch 36 hole rims, and spokes to suit. I know absolutely nothing about sourcing approriate length spokes, other than maybe just measuring the existing spokes when I start cutting them out, bloody hell. Any suggestions for sources of rims and spokes? I had obtained 18 inch shouldered reproduction rims for the Garelli from a company in the U.S., likely Chinese made, and I will have a look at my records to see where I got them from, but open to any source?
There must be a source for replica Borrani rims over there?
After having changed a solitary spoke recently, I was convinced by some on this forum that spoking was easy, so next time around, I'll do it.
Measure everything up before getting the angle grinder to the spokes.
Better, order the spokes and rims you need and rebuild with the originals to hand.

Paul
 
have not found a local shouldered rim supplier yet, found an American supplier that imports Chinese made rims from Italy, then found the place in Italy the American supplier gets them from. Italian supplier also sells direct, and much cheaper. But, need to sort spoke measuring and specifications first. Lots of info on the internet about how to properly measure spokes, who knew?

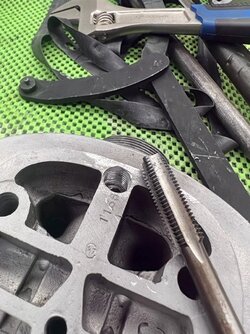
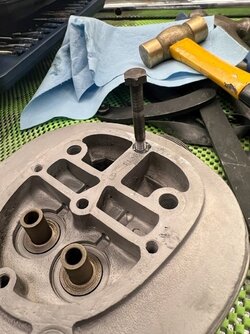
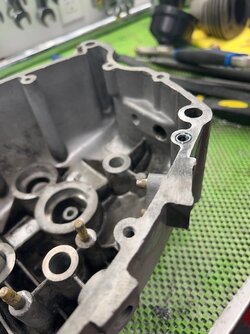
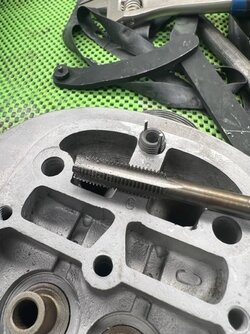
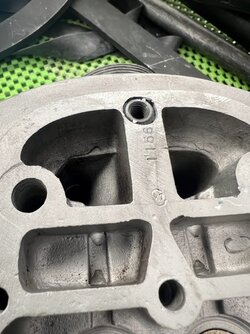
Tonight after work got out the drill, taps, and thread inserts. There was one broken 6 mm bolt in the head I could not drill/tap out, and another 6 mm bolt broken off in an engine case half. Happened to have some 6 mm Keen Serts left over from another project. Drill out the broken bolt, thread the new hole with a 10 mm x 1.25, thread in the Keen Sert, and tap down the pins/stakes. Done. Not required, but I always feel better applying some thread locker to the 10 mm threads as well. The photos will reveal I don't have the special install tool, and I sink the "kees" completely, rather than the prescribed install, but it works for me. IF amy of you do this, follow the manufacturers directions, not my shortcuts....

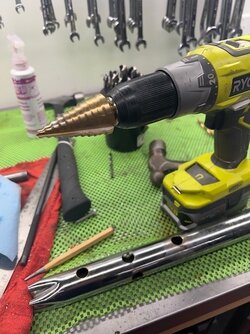
While I had the drill out I drilled a first additional test hole in the muffler pipe before I quit for the evening. The mufflerpipe goes full length inside the bare empty muffler exterior shell, and teh end of the pipe is mostly crimped shut. I don't care about noise......;) Any suggestions on muffler pipe holes? Turn the pipe into swiss cheese or take a more measured approach? Is there any exhaust science i should know about?
Paul LeClair
 

Attachments

  • holes 1.jpg
    holes 1.jpg
    101.1 KB · Views: 22
  • holes 3.jpg
    holes 3.jpg
    93.4 KB · Views: 21
  • holes 2.jpg
    holes 2.jpg
    104 KB · Views: 20
  • holes 4.jpg
    holes 4.jpg
    104.6 KB · Views: 19
  • holes 5.jpg
    holes 5.jpg
    77.2 KB · Views: 22
  • holes 6.jpg
    holes 6.jpg
    95.2 KB · Views: 22
Last edited:
I think there are two ways to approach exhaust design.

1. Read books on exhaust design, work out gas flows, resonance waves at various frequencies, etc. and follow the recommendations and tables in the text books to come up with header size, length and megaphone cone dimensions that might work. Build it, test it, find it isn't optimal, modify it, test it ... go through several iterations, abandon the design and start again with a different reference book. You'll eventually end up with something that works really well at 6,374rpm but not so much anywhere else.

2. Fabricate a pipe from the exhaust port to the back of the bike with as few restrictions as possible. Then move on to another job.
 
Last edited:
have not found a local shouldered rim supplier yet, found an American supplier that imports Chinese made rims from Italy, then found the place in Italy the American supplier gets them from. Italian supplier also sells direct, and much cheaper. But, need to sort spoke measuring and specifications first. Lots of info on the internet about how to properly measure spokes, who knew?
Borrani ?
 
Back
Top