Techy Stuff and Why

I’m no Engee, or physics lecturer, nor do I have experience in flying in stunt planes or have access to F1 teams knowledge.

It’s very hard to see what oil is doing in a sump while cornering. But, every motorbike rider that is mounted on a bike with, a somewhat clear brake fluid resiviour, particularly if low on fluid, will agree that the fluid does indeed slosh from level to left or right while cornering, no matter the G force (created by an old clunker) or angle.

It is my understanding this is why some, most of them use a rubber bellows inside them.

I can’t see why the oil in a sump, 700mm lower than the brake resivior would be any different.
Chris,
I can't say that I've noticed the brake fluid sloshing around in the reservoir. I like to concentrate on the road ahead, looking out for hazards e.g. small marsupials.
The rubber bellows appears to be there to compensate for the movement of brake fluid from the reservoir into the caliper(s) as the brake pads wear. Helps prevent the fluid from absorbing moisture from the air, which reduces the boiling point of the fluid.
Cheers,
bazzee
 
The difference between a handlebar mounted reservoir and a conventional sump is the radius of movement.
The bike rolls around the contact patches. The sump is what ? 300mm above this. The handlebar reservoir is at least 1000mm above.
For a given roll rate - how fast you peel in - the acceleration given to the fluids varies enormously - with the sump in the better case.

I have however seen what could be called the equivalent of the rubber diaphragm on sidecar engine sumps. A flat alloy plate covering the sump opening with cutouts to allow drainage in from above, But the large flat area hopefully keeps most of the oil down where the pickup can get it.
In my experience works maybe 85-90% of the time. A really vigorous aggressive driver can still starve his engine. Dry sumping is really the best option for these things.
 
I have, the bellows has the effect of keeping the fluid at the outlet, no matter the angle. I have a reservoir with no bellows and I often wonder if when cranked over ( or bike laying on the ground ) if the outlet is open to oxygen ingress.
 
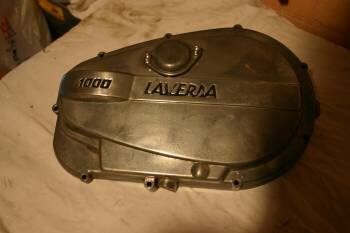
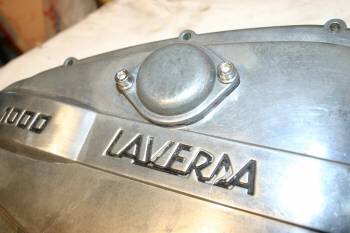
maybe you would like to buy this from me Vince, I don't want to use it because of the 1000 logo (which I could shave just like the factory did, but its a precous thing for somebody), the hole was already in the cover when I bought it, just filled with a rubber bung, joint paste and covered with lockwires from s/t screws, now properly machined and a cover from a 750 fitted.
CLEM
 

Attachments

  • primary cover 1.jpg
    primary cover 1.jpg
    9.7 KB · Views: 8
  • primary cover 2.jpg
    primary cover 2.jpg
    12.4 KB · Views: 7
Just can't understand the reasoning behind this???!!! It means someone has placed far too much emphasis on getting primary drive tension 'right'. Saw a worse version on an SF1 I rebuilt. I'm flabbergasted.
 
Just can't understand the reasoning behind this???!!! It means someone has placed far too much emphasis on getting primary drive tension 'right'. Saw a worse version on an SF1 I rebuilt. I'm flabbergasted.

:sneaky: I'd love to have it fitted and take the bike mechanics apprentice, point to it and ask him to adjust the rockers for me.
 
Chains don't rely on friction to drive so they don't need to be "tensioned" like a belt. But you don't want them loose and flapping around either, which is why there's an adjustable tensioner. Although I think the name "tensioner" is misleading. It's not there to pre-tension the chain. It's really just an adjustable chain guide. If it actually has tension on it when stationary (so you can pluck the chain like a guitar string) then it's too tight.

I can't see the need for an inspection hole. Just screw the adjuster in until you can feel tension, then back it off a bit.

The green book says to adjust the primary chain with the engine running between 2000 and 3000 rpm, by screwing the adjuster in until it whines and then backing it out until the whine stops. I'm not keen on that method. It's a bit too vague. Also, it needs another person to control the engine revs.
 
That whine method was still in the RGS manual too. I get it, and there’s plenty of other stuff we do that is based on feel or sound. But it isn’t nice, so I looked to the forum for a better way. Sure enough, static tighten and back off a bit (depending on the thread).
The previous owner called it a ‘chaff-cutter’, which was very appropriate. A lot less noisy though with new rubbers.
 
Shame they have to be slackened off, I rather like that whining sound.
does the whining sound match the wife? I could imagine things would seem out of whack if you didnt have that in your ear away from her... kinda like people needing white noise to sleep, you need the wifes whining in the ear when you ride the bike?
 
That method, stopping the whine, doesn't work with Andys Duplex chain, what works with that and this is the VAGE bit is do up tight or snug or other non-specific descriptions and back off x amount. There is so much wiggle room in that it worries me a lot. The best description was the one Keith did when these chains first appeared. Oil your hand up and tighten till the screwdriver slips and then do the backing off bit. So to me, that's past where the adjuster touches the chain and in till it takes up the slack and you feel pressure. That is another non-spacific descriptor, 1/2 or 1 or 1/12 turns. I have read a few here I have tried a few and who knows what's correct. Someone said it depends on the thread TPI of the adjuster. So that's why I liked that first inspection bung. It would take the guesswork out of this. The second one was dead ugly so not that one for me.
 
So does being able to feel the chain mean you are adjusting it to perfection? Or is it just as vague as 'till it feels tight then back off a little'???
 
One of the biggest surprises I found ages ago when I was using 2 single chains for the primary was one of those chains was WAY looser than the other. Unknown to me till the cover came off for some reason, I think clutch cush rubbers. I do love the duplex chain, a great thing. Thanks to Andy. I am not actually doing anything about this but if I wasn't so lazy I might.
 
That method, stopping the whine, doesn't work with Andys Duplex chain, what works with that and this is the VAGE bit is do up tight or snug or other non-specific descriptions and back off x amount. There is so much wiggle room in that it worries me a lot. The best description was the one Keith did when these chains first appeared. Oil your hand up and tighten till the screwdriver slips and then do the backing off bit. So to me, that's past where the adjuster touches the chain and in till it takes up the slack and you feel pressure. That is another non-spacific descriptor, 1/2 or 1 or 1/12 turns. I have read a few here I have tried a few and who knows what's correct. Someone said it depends on the thread TPI of the adjuster. So that's why I liked that first inspection bung. It would take the guesswork out of this. The second one was dead ugly so not that one for me.
That blade is more an anti flap device than a tensioner. Avoids excessive noise and slack on take up.
The whining technique certainly isn't any good for the tensioner itself. Do up snug and back off one turn. Or more if you're using twin single chains which wear unevenly as is amply documented. They stay noisy whatever you do.

Remember that some early endurance racers had no tensioner, just two anti flap guides.

Paul
 
I guess the question is - is it an actual problem which needs a solution?
Exactly. The blade has worked fine for half a century, no great reason to change it. The "tensioner" should only take up MOST of the slack to quieten things down and avoid excessive flapping of the chain, which can inflict damage on other components in the drive train. The chain should run without any noteworthy tension, with no whining or clatter. Thing is, chain tension changes with heat, a cold engine will sound different to a hot one. A chain erring on the loose side when cold, can be rather taut when hot. It isn't so much the chain expanding but the cases expanding more than the chain, increasing the distance between crank and mainshaft. A really good example that shows this up are H-D big twins with their metre-long primary housing. When cold, the primary chains need to be adjusted rather loose, as things heat up to operating temp., they tighten up considerably.

piet
 
"Just can't understand the reasoning behind this???!!!" (refering to my pri cover the 750 valve cover)

this is the reasoning
dont be too hard on me, I bought that 1000 logo'd primary cover for scrap, it was a horrible disgusting mess by the DPO, paid my engineering helper to properly fit a valve cover, and then polisher to shine, and make it a usable item, I never fitted it, because of the 1000 logo and the fact that I wouldn't part with the original cover, suppose it could have been plugged and welded, but that (usually) would be detectable anyway, because no part of the cover is actually flat on the outside.

CLEM
who loves bring unusable parts back into service.
 
Back
Top