Building my Jota

Piranha Brother 2 said:
Very cool and groovy, Todd. CR didn't make it easy for fitting calipers, did they!


Hi Mate, no they didn't make it easy at all. I would really like to know who is the manufacturer and designer  of their fork parts, as CRS just seems to assemble them.
Theres no doubt these are good forks, with the amount of them being used out there, but I think if I were to look at their forks again, I would prefer to go top the source of them , rather than a middle man .

 
Ok , so while I am waiting for lots of things to arrive for the project, a couple of friends have been mucking about with me on two little projects

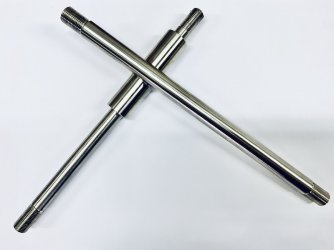
I ran out of time to do this  because of work , so my mate machined up a new swing arm spindle and bearing spacers , and a rear wheel spindle ( I have a few more bits to make but i will do those when I have the time, but now at least I have parts for this weekends work in the shed ). I had some Nitronic 50 laying about and rather than buying in some 4130 we decided to make them out of the Nitronic. Nitronic is a really good material that we use in the marine industry for making everything from high load pins to high load hydraulic cylinder rods, and rods for standing rigging. It doesnt get rusty or corrode, nor does it mind saltwater. I kept the metric fine thread on them, and it took a while to find some wholesale metric fine thread Nyloc's, but I did get them in both M14 and M16 in the end..... if only we had McMaster Carr out here!

The next one is I want to make a new alternator cover for my bike, as the one I had was cracked badly and covered in gravel rash. I welded up my one to get it back to shape and then a mate of mine and I scanned it. I really want to get a 3 d scanner, but nothing I can afford comes near to what he uses at work, Its a hand held scanner that you wave past the object you want to scan.... his cost about 65K euro, thats why it became a project with him ! The cover was set up on a holder for us to get a complete inner and outter surface scan. From the video clip you can see the weld repair on the inside and the outside. The 3d file that is created now needs to be cleaned up, so all the rough edges taken off it, and we will take out the weld marks in the scan , and then it gets imported into cad software, most likely this one will be done  in Rhino, its imported as a .stl file and then we clean up the file more, and set about making a 3d file that can be used either for cnc machining or 3d printing in aliminium, or we can even 3d print it  in abs and then use that for casting. Once Im done with the file , I will get pricing on producing a run, so if anyone is interested sing out. I have no idea what each unit will cost, clearly volume gets better pricing, depending on the numbers needed, that will dictate which manufacturing way I go. But at the very least we already have 6 of these spoken for when they are ready for being produced.

https://vimeo.com/461774929


Attachments

  • IMG_4776.jpeg
    IMG_4776.jpeg
    74.3 KB · Views: 171
alternator covers (and 100% excellent ones) are already being made and sold, the Italian dealers have them, and they are very good value for money, the remaining world wide dealers can get them (or have them) but double the price, I bought two just over a year ago, the price was 200euros.
CLEM
 
CLEMTOG said:
alternator covers (and 100% excellent ones) are already being made and sold, the Italian dealers have them, and they are very good value for money, the remaining world wide dealers can get them (or have them) but double the price, I bought two just over a year ago, the price was 200euros.
CLEM

pray tell who are the italian dealers?

In any case this is a fun project, its quite cool to be able to do things amongst friends
 
best one is the man who sorted them and sourced them
Ricardo Oro tel 0039 0445 873005
one hour ahead of us and likely not there between 12.30 and 15-00
he speaks excellent English
CLEM
 
CLEMTOG said:
best one is the man who sorted them and sourced them
Ricardo Oro tel 0039 0445 873005
one hour ahead of us and likely not there between 12.30 and 15-00
he speaks excellent English
CLEM

thanks Clem
 
he only made the one batch of about six/eight (and I doubted the story at the time) and then as far as the Laverda circle is concerned , he shit his own pants. it is known that he has been buying Laverda parts in the recent past.
CLEM
 
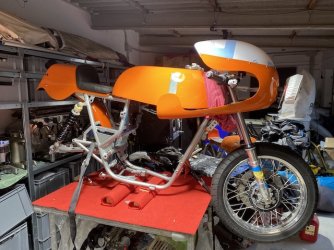
So I had the goal of having a rolling chassis this last weekend, I didn't quite make it.

As I am making some things here in Palma, I use the original item to replicate from, and then I fit them, from there I see I can change the dimensions a bit , so things are neater to me.
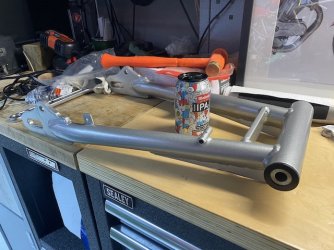
for example the swing arm pivot spindle, with the metric fine pitch nylocs I am using could be shortened by 5mm each side, so once the spindle  was dry fitted, that became obvious. I didn't want to use an angle grinder or a hacksaw ( painfully slow cutting with Nitronic) as I wanted the machined chamfered edges on each end of the spindle, so it looked properly done, rather than bodged.  So that kept me a day away from my goal, as well as my rear brake calliper bracket not having arrived.

But in any case a good Saturday was had with a couple of mates in the shed for a few hours.

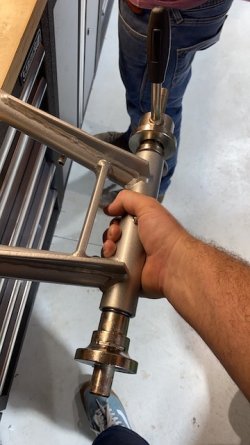
I have a Sealey steering head bearing press, which worked a treat on the steering head, this came in great for pulling in the swing arm bearings. I bought one to share between 5 of us, and it has already paid itself off.
I put an o ring in for the spacer for the bearing support to sit against, which let me hang my freshly made black delrin spacers on
Finally I got to see my rear shocks in place and everything looked tickety boo.

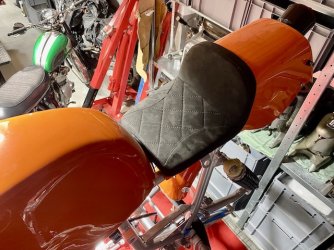
The seat came back from Carolina, we decided to 86 the leather and I found some Alcantara to use in place, the leather was 3mm, the alacantara is 0.9mm, and that made a huge difference. It fits right on, I will be using Dual lock to stick it in place, so its easily removable. If you dont know what Dual lock is, its a 3m product, much like velcro, but its more industrial, there is no ,male female side as there is with velcro, it is just line a bunch of little mushroom shapes that lock into each other when pushed together, its really strong, we use it for a mountain of things and super yacht builders use it to hold their yacht headliners in place ( in normal terms thats ceiling panels) And they hold up in some pretty strong weather and waves.

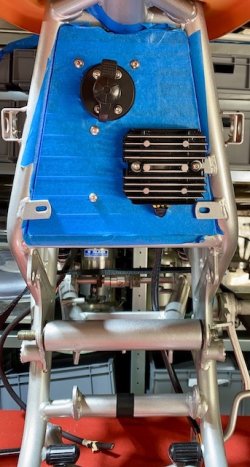
I put in the kill switch , this is what should help me kill the voltage to the starter relay should it stick itself open, a few people have said they dont know if the solenoid is up to it, and a few have said it will be fine, so this is my insurance policy, remembering that this bike wont have an ignition key or switch. So it beats trying to madly pull of seats and battery terminals. Im pressing out a rubber disc for the kill switch to mount on on the bulkhead, it will be around about 5mm thick, The Reg is now rubber mounted and so is the M unit too.

I have some nice H3 LED bulbs from France turn up to put in the Marchal's , There will be a bit of modification needed there , but it makes me happier Im not running halogen bulbs with a Lithium battery, and I hate not seeing at night.  heres the link if anyone is interested. https://www.ledperf.eu/adjustable-h3-led-bulb-for-motorcycle-p-34675.html

Im waiting on two new front disc carriers to arrive, as one I had was warped, so as soon as they are here I can make a new front spindle and finish off the front brakes.
Its a bit of a race now to see if I finish before the engine is finished.


Also in the mean time I found an original good condition,  second hand  alternator cover in Italy for 100 euros, I will still go ahead with my replication project, but as I now have a new one , I will let that go on a back burner for the moment, especially as work is picking up for our winter season.

I do realise that Im green at this sort of thing, and that most of you blokes have way more experience in your little fingers than me, however for those of us that dont have this experience , newbs to these bikes  can see my fuck ups , and learn from where I go wrong too, . I take everyones comments onboard, I figure if im doing something completely wrong you guys will let me know.
 

Attachments

  • 1.jpeg
    1.jpeg
    78.6 KB · Views: 348
  • 2.jpeg
    2.jpeg
    115.7 KB · Views: 354
  • 3.jpeg
    3.jpeg
    130.7 KB · Views: 357
  • 4.jpeg
    4.jpeg
    134.5 KB · Views: 353
  • 5.jpeg
    5.jpeg
    99 KB · Views: 348
sideshow said:
super yacht builders use it to hold their yacht headliners in place ( in normal terms thats ceiling panels)

Hey Todd, don't be a "deck head" and give away all our terms, its the secret language that keeps the punters guessing. :D

bike is looking great by the way, nice work. :)
 
Good stuff, Todd. I'm now interested in the LED s and have found what look like excellent kits in Oz using Phillips LEDs (AU$67 each). I'll check I have room in the twin Kwaka lights for the heat sincs.

Hope you never need to grab that interrupter switch! Once a relay seizes ;'on' it's a direct line from battery to starter. What goes first? The battery or the starter?!
 
Piranha Brother 2 said:
Good stuff, Todd. I'm now interested in the LED s and have found what look like excellent kits in Oz using Phillips LEDs (AU$67 each). I'll check I have room in the twin Kwaka lights for the heat sincs.

Hope you never need to grab that interrupter switch! Once a relay seizes ;'on' it's a direct line from battery to starter. What goes first? The battery or the starter?!

yeah the LED's are a no brainer
 
TC said:
Hey Todd, don't be a "deck head" and give away all our terms, its the secret language that keeps the punters guessing. :D

bike is looking great by the way, nice work. :)


hahahahah nice pun.... i wasnt even going to go near deck head, or even talk about soles, spurling tubes or limber holes.... I doubt even if modern boat builders still even call them that
 
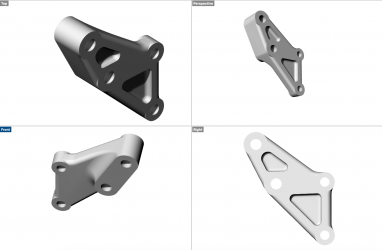
So a bit more progression has happened in the calliper adaptor design. My mate, Steve and I have been playing around with it, and rather than the calliper adaptor being a slab sided thing like some of the adaptors you see out there, I wanted it to actually look good, as though it was a thought out part of the bike, rather than an afterthought , and we shed a bit of weight too.... see the updated calliper adaptor below with pocketing, it is starting to look pretty awesome. Im enjoying using Rhino, but I still have a lot to learn how to use the software, I think I need to enrol in online classes.
This coming week I hope I will have a big push, In theory I should be installing the battery box etc

if anyone is interested in learning about or seeing what the hell Rhino is heres the link
https://www.rhino3d.com/

or you can watch a time lapse of someone who knows what they are doing modeling a Mclaren. Its longish but you can scroll through it. Its a pretty amazing tool

https://youtu.be/lB_6xdg1IF8
 

Attachments

  • Caliper adaptor rendering.png
    Caliper adaptor rendering.png
    165.4 KB · Views: 184
Back
Top