Reviving a battered 1200

I believe Laverda triple valve buckets came in two different lengths / heights , whatever you want to call it ......... Be wary of fitting longer length buckets into an engine which has previously been running on shorter ones ...... they may seize before they " run in " ...........
 
Last edited:
I believe Laverda triple valve buckets came in two different lengths / heights , whatever you want to call it ......... Be wary of fitting longer length buckets into an engine which has previously been running on shorter ones ...... they may seize before they " run in " ...........
Not only 2 lengths, but also 2 different wall thicknesses to accomodate the optional double springs. At least from RGS>, the short/thin version were fitted.

piet
 
Not only 2 lengths, but also 2 different wall thicknesses to accomodate the optional double springs. At least from RGS>, the short/thin version were fitted.

piet
Hi Piet,

Would the buckets need a hole, as the cavities are already drilled? I do not see the necessity for the buckets holes, or do you have other insights?
Reverse engineering this, I think that the first head would have no holes in the head but the buckets were ventilated?
 
Wouldn`t it just be easier to determine which buckets you already have , and then fit genuine Laverda replacements ....... It`s some years since I replaced the ones on my 1200 ( for fitting into a spare head whilst the original was being overhauled .... these were shorter ones , so should have been ok no matter what was fitted before , and moved up and down nicely , with no binding ) , but presumably they are still available from someone , somewhere ?
 
Hi Piet,

Would the buckets need a hole, as the cavities are already drilled? I do not see the necessity for the buckets holes, or do you have other insights?
Reverse engineering this, I think that the first head would have no holes in the head but the buckets were ventilated?
The holes are for additional ventilation, big oil drain bores at the bottom of the tappet bores. These are probably large enough by themselves for adequate tappet ventilation.

Which auto tappets exactly have you found to fit? I've scoured many catalogue pages without real success.

piet
 
The holes are for additional ventilation, big oil drain bores at the bottom of the tappet bores. These are probably large enough by themselves for adequate tappet ventilation.

Which auto tappets exactly have you found to fit? I've scoured many catalogue pages without real success.

piet
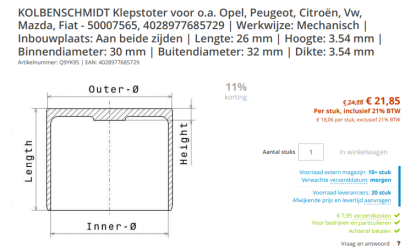
I got the following cups :


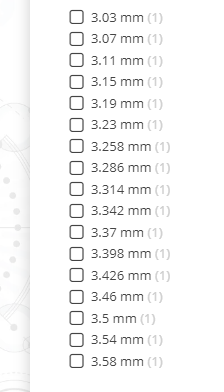
1724933443250.png

thickness should be ok, as they are available in several thicknesses/ "height".
 
If they are available in 2.2-2.5mm thickness, you could end up using the thicker OE Laverda shims and have enough scope to play with in the future. With 3.54mm, you'll be working at the lower end of the Laverda scale. Positive... lots of (too) thin shims about!

Pretty expensive in NL, range from €8-14 here! Cannot find for which exact vehicles these are meant, therefore no differing thicknesses to be found.

Stock Laverda tappets are 2.2mm thick.

piet

Found it; Opel/Vauxhall 1.6 turbo. Thickness ranges from 3.00-3.60. Might be possible to machine them internally.
 
Last edited:
Yes, but basically 0.8mm too thick.

You lose this in the range of Laverda shims and start off with 1.80mm instead of 2.60mm when overhauling the head. You could of course use different springs and valve lengths to compensate, that just makes things more complicated for future repair work.

When reconditioning a head, I aim to get as close to factory specs (or better) as possible, making use of stock or repro parts to factory spec in order to make future maintenance and repair as hassle-free as possible. Using one-off stuff here and there is quite OK if you intend to keep the bike forever, but an absolute nightmare for whomever may have to work on it in the future (been there, seen it, fell headlong into the pit...).

piet
 
No springs attached, I think there is no connection to the springs, as there is no extra compression or relaxation, this is specified by the cam lift height.I think with the smallest 1.8 mm shim and varying the bucket height there will be a fit.
From my engine, just a random inlet shim/bucket I get :
Total height: 4.95mm
Total height without shim :2.22
Shim is : 2.73
With the bucket is indicated 3.03 ( from Kolbenschmidt) mm we would need a shim 1.8 mm( which is the lowest, I know ) and could even go lower, still have 0.12 of a mm to play with. Or am I totally making sure this is right ? :)
 
Laverda shims, from the factory, came from 1.85-2.70mm going up in 0.07mm increments.
I've read that some brave souls have gone down to 1.3mm but I believe 1.6mm is a safer minimum.

OCT provided me with replacement buckets some time ago. They get a hard time under the 4C profile so I'd want to be damn sure about the hardness treatment of any replacement buckets.

As Piet says, non standard thickness buckets are a potential man trap for a future owner!
 
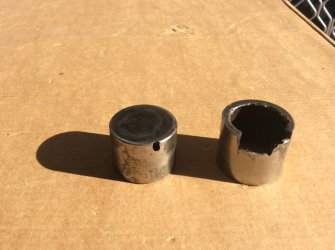
get it wrong and this is your reward, left side item was "linished" on upper contact surface to obtain lash clearance, second was oil starvation to the upper valve train ( idiotic post oil pump relief hole ), as ever, previous owner idea of engineering without skill.

Most important is that the upper surface has the "clocking" radius, not mentioned as yet. j
 

Attachments

  • Laverda_Buckets.JPG
    Laverda_Buckets.JPG
    115.8 KB · Views: 25
Working my way up the ladder again , from catastrophic project to succes, I hope.
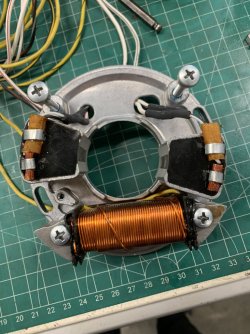
Building the clutch and primary side cover, magneto, and the charging coils.
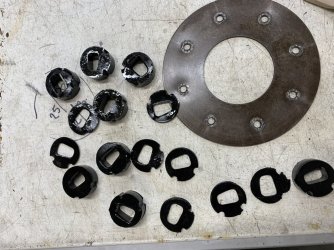
I found peculiar rubber shims in the primary drive, anyone have experience with these?
1725035636486.jpeg
 
Working my way up the ladder again , from catastrophic project to succes, I hope.
Building the clutch and primary side cover, magneto, and the charging coils.
I found peculiar rubber shims in the primary drive, anyone have experience with these?
View attachment 92143

If the engine has already been overhauled, the rubbers may still be OK. But it looks like you've already got new ones.
Was the end plate that covers the rubbers screwed or riveted? The marks look like screws with serrated lock washer.
The prevailing recommendation here is to install the screws without lock washers, as otherwise they could rub against the primary cover.
 
Back
Top