The fall and rise of a works SFC engine

I bet there were a few beers drunk while pondering a resolve. A good outcome though.
Yeah, a couple of cases sacrificed themselves... ;)

Wasn't so much the question of what to do, but how to do it without having to flog off a kidney. Ground steel plates in the required size don't come cheap. There's not much you can do with it when the job's done except to wait for the next busted crankcase!

piet
 
Perserverance paying off, Piet!! I take it you won't be trying to source exact replacements of those factory racing rods for reassembly and the next trip to the track? :eek: :ROFLMAO:
 
very cool outcome, Piet, and just another great example of you actually "living in the material". Guess your Aussie-roots have kicked in, as this "thinking out of the box" is for sure not common over here ;)

Cross my fingers for a great outcome! You 100% deserve it!!
 
I forgot, Chris, you are right... Was MacGyver actually Aussi? Maybe not, I also can't see Piet using a ball pen spring and a foldable pocket knife...

But then - he is not finished yet, right... 💁‍♂️

😂

Honestly - super great result! crossing my fingers the biggest hurdles are taken and the rest goes smoothly!
 
Honestly - super great result! crossing my fingers the biggest hurdles are taken and the rest goes smoothly!
Ha ha... obviously never taken a SFC crank apart. Whole next level of stubborness. Incredible interferance fits and nothing to hold on to without bending/buckling the whole thing. Guess they weren't made to be overhaul-able. Certainly going to need the MacGyver mindset for rigging up supports for the disassembly. I've got some ideas, not fit for public viewing though, Health and Safety would suffer a terminal seizure. ;)

piet
 
Ha ha... obviously never taken a SFC crank apart. Whole next level of stubborness. Incredible interferance fits and nothing to hold on to without bending/buckling the whole thing. Guess they weren't made to be overhaul-able. Certainly going to need the MacGyver mindset for rigging up supports for the disassembly. I've got some ideas, not fit for public viewing though, Health and Safety would suffer a terminal seizure. ;)

piet
Be careful, please, don't put yourself into a long list of people endangering or fataly harming themselfes, that is not really worth it... :oops:
 
Be careful, please, don't put yourself into a long list of people endangering or fataly harming themselfes, that is not really worth it... :oops:
He’ll bang out a bit of Aussie ‘She’ll be right mate’ or get to meet the neighbours via a bit of flying metal through their roof. Blame one of Elons satellites 🛰️ returning from space in the form of space junk Piet.

But the game might be over when you ask for it back 😉
 
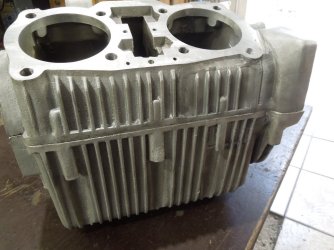
I had delivered the upper crankcase to machinist Harry end of January, he said he'd need until mid- to late Ferbuary. Well, the end of February came and went, as did the end of March, April and May. Pretty disgusted, I called him June 1st, he'd get it done this week. Lo and behold, the long-awaited call came Tuesday afternoon! Made my way through truely horrific Cologne traffic Wednesday morning and came away very relieved. Only 0.3mm was needed to be removed to get the barrel gasket surface flat and back in line. A dry fit with the empty cases will show if the frame still fits the engine lugs. Guess I can make a thicker base gasket if required.

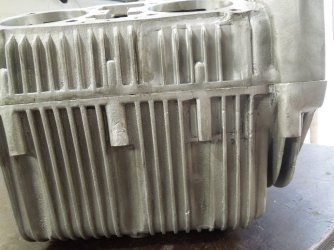
Spent today masking and bead-blasting the cases followed by a thorough wash with the pressure washer and several m³ of compressed air. All threads were chased yet again to remove any remnants of blasting media. Also made sure the oil passage from the pump to the cylinder base was clear, 2 welds ran right through that passage.

Pretty satisfied with how the repairs came out. Not invisible, but nowhere as ugly as I had feared. The old warrior will carry its battle scars with dignity! It is a shame though that the lovely "racing engine" patina with all the scratches and bruises the engine had has now been lost, hopefully that will return after it has been put to use again.

Now to build a crank... :rolleyes:

piet
DSCN1935.JPGDSCN1936.JPGDSCN1937.JPGDSCN1938.JPG
 
I know what the 'before' pics were like, so this is a fantastic outcome, Piet. What rods are you planning to use? I've heard that factory works SFC rods are the go :ROFLMAO:
 
Last edited:
Ged Shortens welder mate was showing me pictures of the blown up engines he has welded for the guys who race at Goodwood. A lot of expensive exotica have the same scars as Piets motor. I suppose you could call that patina, why not?
 
I know what the 'before' pics were like, so this is a fantastic outcome, Piet. What rods are you planning to use? I've heard that factory works SFC rods are the go :ROFLMAO:
Quentin,

I had planned to fit Carillo rods, but that doesn't look like it will materialise. I'm also quite worried about the weight difference between Carillo or Arrows rods compared to the mega-thin '73 items, there's simply not enough metal in the crank webs to compensate. I'm pretty reluctant to fit huge lumps of tungsten to regain balance, this would defeat the whole exercise in large parts. IIrc, the entire crank with bearings weighed in at under 11kg. Although I reckon the engine will never again be used in anger, I would like to preserve the lightning-quick revving characteristics of the crank.

I've come to the conclusion that standard SFC rods might be preferable, if anybody has a pair surplus to requirements, I'd be interested. ;) Failing that, I've thought about reducing the width of a standard 750 rods' big end. Quite a few grams can be shed from the stock rods without compromising strength, but they'll still end up a good deal heavier than what's in the crank now.

Anyway, next stage is to machine a support jig for crank disassembly. If any of the other SFC cranks I've done are to go by, this one is going to be a challenge. Nothing much to support it and probably an enormous amount of tonnage needed to get it apart. Not particularly looking forward to that, but I guess I've just gotta pull my finger out and do what needs to be done.

piet
 
Perhaps somewhat random comment, but I was just checking some gasket materials.
I have found that perhaps the best cylinder lower end gaskets for triples has material Victor Reinz AFM 22 1.00mm thick.
Not sure if the same applies for 750s.

Just bought a similar kit than this one at my local shop. One of the sheets on this assortment is Victor Reinz AFM 22 1.20mm thick. The size is 500x300mm, not A3 as stated (A3 is 420x297mm):

At least several of my local suppliers are offering the same gasket paper assortment.

-Jouni
 
Last edited:
Back
Top