Building my Jota

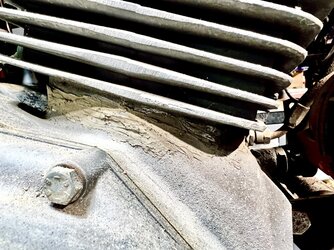
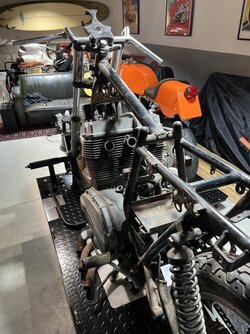
We had two public holidays this week , Monday and Wednesday. On what seems like my first day off in 2 months, I’m in the shed pulling the 1200 apart to get down to the frame so that can have all my orange Jota gear transferred to after painting. I did actually start this bike shortly after I acquired it , and it ran smoothly , even with what looks like an external gasket made from das modelling clay ! Hopefully before Christmas the frame is out for painting and late Jan assembly should start again.
 

Attachments

  • D57BA209-11D7-41C2-BD44-F0B551350ADD.jpeg
    D57BA209-11D7-41C2-BD44-F0B551350ADD.jpeg
    230.8 KB · Views: 63
Had a good 3 hours today , the nipper came and supervised. All electrics off , brakes off and ready to template out the fairing mount holes on the steering head. Everything that came off is bagged and tagged. The bike got a bit of a vacuum clean , as well, doesn’t look much flasher 🤣🤣🤣🤣🤣
Nothing too untoward found. When the bike did start that time it ran smoothly as it could. But the engine needs a re build to say the least
 

Attachments

  • B051584A-A392-4E4A-9CAE-ABF13927A55C.jpeg
    B051584A-A392-4E4A-9CAE-ABF13927A55C.jpeg
    189.7 KB · Views: 117
  • FAA9172E-CEDE-4976-A3B3-F90EE0CA9E87.jpeg
    FAA9172E-CEDE-4976-A3B3-F90EE0CA9E87.jpeg
    223.2 KB · Views: 114
  • 90E4780E-B087-46BD-8009-960B2F18CD4A.jpeg
    90E4780E-B087-46BD-8009-960B2F18CD4A.jpeg
    199.9 KB · Views: 100
  • 02354456-AEB6-4696-A461-A4C30C65FEE8.jpeg
    02354456-AEB6-4696-A461-A4C30C65FEE8.jpeg
    221.8 KB · Views: 114
Last edited:
I have had to get a new compressor and blasting cabinet for work , for some new projects I have been working on , I was blasting a nice titanium part I just had made , to take the shine off it and I saw the spare end cap that came with my exhaust. I couldn’t help myself. I knocked the shine offf it and I really liked what I saw. It’s kind of a zincy galvv look. I’m going to sit it outside the next few weeks and see how it ages, if that doesn’t go well, I will blast it again and have it cerakoted in a matt clear finish. I’m thinking the whole exhaust could look quite cool like this.
Work has been a bit full on these last months. So progress is slow on the Jota. Hopefully in 2-3 weeks I can pick back up the pace.
 

Attachments

  • EAC5A7A7-8EFD-45EA-A3B7-0EF88FEF4657.jpeg
    EAC5A7A7-8EFD-45EA-A3B7-0EF88FEF4657.jpeg
    176.7 KB · Views: 56
I did similar to an 860 Ducati Bevel Tank and cleared it, it had a sort of Industrial look I liked but it collected stains really easy even with the clear coat.
 
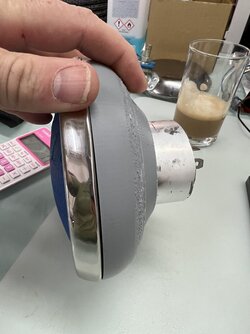
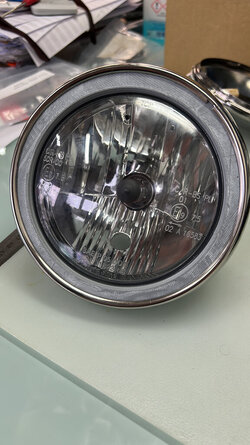
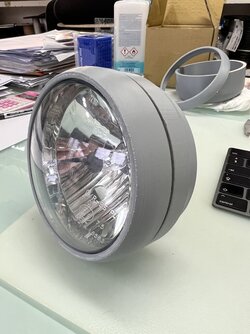
work has been quite full on of late, and not a lot of time is available for home, so while procrastinating at work, or giving my head a break, I have been on the never ending quest to solve my headlight issue. I want the twin light look, I have rattled on in the past about it, and finally I found some light inserts that are homologated! The lenses are 10mm OD smaller, and the inserts are quite a lot deeper than I wanted, so I have been working on a solution by drawing in 3 d a new bucket, and lens rim. They are based on the same OD dimensions as the original Marchal 810/819 spots.

People have said I should just put a single headlight on for getting an ITV/ Roadworthy? warrant of fitness, but I dont see the point inn having to do that every time I need to renew it, and I have no idea what the legal ramifications are if Im pulled over and they check the lights... some of the police doing that are are quite anal about checking things, and to be honest getting fined or having my bike taken off the road arent my idea of fun.... thats one of the biggest things that has changed, we used to get away with so much in the past as far as little mods here and there on bikes and cars went, I know rules are for the greater good, but Im getting over all the new rules that keep coming up, it makes like so vanilla, and worse my kids dont get to experience life the way I did when I was a kid, life seemed a lot easier

So I have this side project that I can do while I am at work
I started drawing completely different bucket shapes, and the first couple looked a lot like the V6 racer headlights, I wasnt keen on them, but the renderings came out nice.
Photo 1 is the first rendering of what i call the V6 light. ,
Photo 2 is a further variation

Then I got the bright idea to do a lens adaptor ring that would effectively bring the new headlight insert up to the same diameter as the Marchal lens, that worked... you can see everything is designed around the original parts of the spots.

Photo 3 shows the depth of the light, I have cut off the brackets and breather tubes to be able to fit it into a more Marchal shape bucket
Photo 4 is the adapter ring for the lens to fit in the original Marchal lens space
Photo 5 is the rapid print, thats why its quite low resolution, I printed on the fastest print setting, that still took 7 hours, If I did a high quality print, then it would take a considerable time more.

the next step is to cut the moulded tube around the light bulb clamp area, once thats done I can partly hide the end of the bulb , by cutting a bigger hole in the mounting plate that the lights mount to... hopefully then the lights will look pretty close to what I want.

the buckets will be made in Ali, glass blasted to a matt finish.

Now I just need to draw the same mounts that the marchals use and I will be away laughing.

aside from being a bit time consuming, its fun making progress, especially as I feel Im still moving forward, without any shed time at home. Hopefully after Easter I can get back in the shed again.
 

Attachments

  • IMG_2171.jpeg
    IMG_2171.jpeg
    103.9 KB · Views: 19
  • EA7D3193-B2EC-4768-8ED7-2EC7670845B1.jpg
    EA7D3193-B2EC-4768-8ED7-2EC7670845B1.jpg
    129.9 KB · Views: 19
  • 0995FF15-42EB-417F-96C2-62EC1DC49FD9.jpg
    0995FF15-42EB-417F-96C2-62EC1DC49FD9.jpg
    82 KB · Views: 22
  • IMG_2097.jpeg
    IMG_2097.jpeg
    130.2 KB · Views: 22
  • IMG_0168.PNG
    IMG_0168.PNG
    491.4 KB · Views: 22
So that makes it a 3D headlight?

See that pile of paper on your desk. Today I cleaned my office desk, to rid the desk of paperwork, two days of work left. Straight in the big bin, didn’t even look to see what it was! Listening to my coworkers dealing with some shit I usually have to ...... my best reaction..... not my fucken problem!
 
Last edited:
So that makes it a 3D headlight?

See that pile of paper on your desk. Today I cleaned my office desk, to rid the desk of paperwork, two days of work left. Straight in the big bin, didn’t even look to see what it was! Listening to my coworkers dealing with some shit I usually have to ...... my best reaction..... not my fucken problem!
thats the feeling of freedom, you must feel pretty stoked to be away from the shadow of that.... I think its awesome the change you have made. I think slowly Im getting more into that mode too, Im increasing focus on custom hardware solutions that Im doing, hoping that may take over eventually,. or have it turn into a job for semi retirement, where I just get emails from people asking for work. I much prefer solitude.

looking forward to seeing truck photos!
 
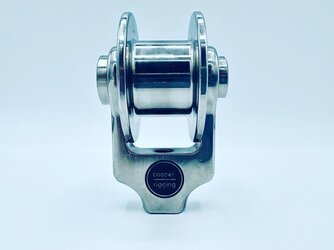
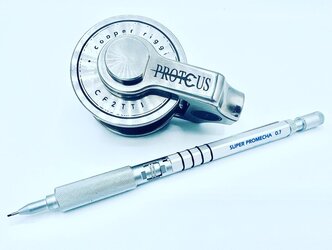
This is the latest design I just did, 2 ton work load and the sheave is optimised to take two 6.5 mm ropes running in opposite directions through the sheave, one rope goes right and the other left, so both pull equally when loaded , only 186 grams in grade 5 TI! I want to get into kore of this work , and concentrate on it at semi retirement age, but thats about 12 years away, so there is time to build this side of work up.
Probably only light designing for those of you who are engineers out there, but I find it a ton of fun to do something I never would have thought I would be doing 20 years ago
 

Attachments

  • 5D68B423-091D-412D-AC07-4F92781BBD1F.jpg
    5D68B423-091D-412D-AC07-4F92781BBD1F.jpg
    66.8 KB · Views: 27
  • 18EAEE4D-EA42-4A45-A158-3D912A087E95.jpg
    18EAEE4D-EA42-4A45-A158-3D912A087E95.jpg
    89.1 KB · Views: 27
Last edited:
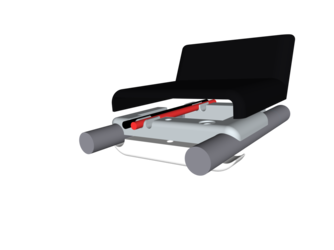
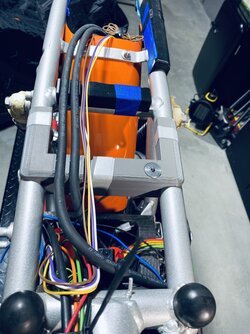
Finally another part of the project finished. This is the support/ clamp I designed for the Jota, having put the SFC tank on, and the seat/ tail unit , I couldn't use the original set up for holding the seat down. So I came up with this, its a clamp/ support, to attach the forward part of the tail unit to, and the seat, it does a couple of duties. The top part of the clamp/seat support is printed in TPU thermo plastic, with a shore hardness of 90, this is printed with 100% infill, its firm, but good for vibration dampening as well. I have flush mounted sleeve nuts in M6 to fasten the two pieces together to clamp on to the frame tubes, the aluminium lower part has thin TPU in grey in the areas where it goes around the frame tubes , to stop it damaging the frame .The top part routes the battery cables and ancillary cables for the tail light etc to the seat hump where the lithium Ion battery is housed. You can see in the quick renderings I did how it all fits together. The red and black cylinders represent the battery cables.The TPU is a little stringy in places where the retraction of the print nozzle pulls hair like stands of TPU away when it moves to the next part of the print, something I am working on getting better at when I write the G code for the print. The upper forward part took 23 hours to print, and the upper aft part took 12 hours to print, but I haven't got it in the photos here, just the rendering.The lower part machined in Ali was printed in PLA to start with, for proof of concept, and then machined in ali. The last photo just added shows the prototype stage , but it gives a clearer idea than my basic renderings
 

Attachments

  • IMG_0186.PNG
    IMG_0186.PNG
    134.5 KB · Views: 60
  • IMG_0184.PNG
    IMG_0184.PNG
    80.9 KB · Views: 39
  • IMG_0182.PNG
    IMG_0182.PNG
    129.2 KB · Views: 37
  • IMG_2852.jpeg
    IMG_2852.jpeg
    184.9 KB · Views: 37
  • IMG_2849.jpeg
    IMG_2849.jpeg
    184 KB · Views: 60
  • IMG_6873.jpeg
    IMG_6873.jpeg
    156.4 KB · Views: 55
Last edited:
When I made my one-off custom SFC twin replica seat to fit my 3c the hardest thing was finding a way to hold the rear of the seat on the frame and not have it stick out like a sore thumb. I also tried to find a way to reduce any transmission of engine vibes through the seat. Both are not an easy fix. There is that pun again.
 
When I made my one-off custom SFC twin replica seat to fit my 3c the hardest thing was finding a way to hold the rear of the seat on the frame and not have it stick out like a sore thumb. I also tried to find a way to reduce any transmission of engine vibes through the seat. Both are not an easy fix. There is that pun again.
yeah, actually the rear was easy on this one, luckily there were tabs on the frame aft, I may be wrong, but i seem to remember for my bike the indicators were fixed to them? But you are right, a lot of thought goes into making things simple and clean
 
Todd that is so neat! Awesome job and fun learning and developing your 3D-print skills.

You should see the mess of wires under my seat hump! Not pretty and will be annoying if I have to remove the seat often! i'll cable tie as well as I can but need some length to enable me to disconnect stuff when removing the seat. If it really shits me I'll have to fashion some better multi-pin block connectors.
 
Todd that is so neat! Awesome job and fun learning and developing your 3D-print skills.

You should see the mess of wires under my seat hump! Not pretty and will be annoying if I have to remove the seat often! i'll cable tie as well as I can but need some length to enable me to disconnect stuff when removing the seat. If it really shits me I'll have to fashion some better multi-pin block connectors.
I hear ya. I hate electrical spaghetti. I hope to avoid it , I have made a small carbon tray that sits under where the original battery floor was, where all the plug connections will be. I will work extra hard to keep that tidy, I’m looking forward to your pics. !
 
a lot of thought goes into making things simple and clean
Yep. Nothing so elegant as the simplest solution, and it’s worth every minute spent to get there.
Your technology must make it easier, instead of ending up with a bin full of scrap metal like the one in my shed, only useful for making smaller and smaller gizmos 😁
 
Yep. Nothing so elegant as the simplest solution, and it’s worth every minute spent to get there.
Your technology must make it easier, instead of ending up with a bin full of scrap metal like the one in my shed, only useful for making smaller and smaller gizmos 😁
That's me! I find all sorts of uses for ever smaller offcuts.
 
Back
Top