You are using an out of date browser. It may not display this or other websites correctly.
You should upgrade or use an alternative browser.
You should upgrade or use an alternative browser.
Building my Jota
- Thread starter sideshow
- Start date


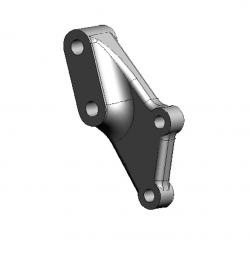
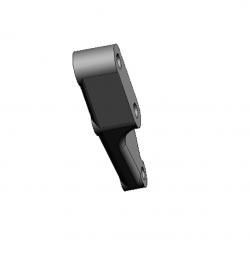
A very smart way of doing it!sideshow said:So i was going to design a calliper adaptor for the brake caliper to my CRS forks, and randomly looking through other bike builds online, I saw that my friends at Revival Cycles in Texas, had used the same forks, same brake caliber and 280mm discs on one of their builds. Their adaptor was roughly similar to what I had started to draw up. I had a quick chat with them, and to save re-inventing the wheel, they kindly gave me the 3d .step file of their adaptor. Unless you have designed these things, as simple as they look, they actually take a lot of work to do, so it was great that they helped me out, and with no charge, which in itself is very unusual in this day and age. I did offer to pay for the drawing, or to have them mill a set, but they refused and shared some knowledge .
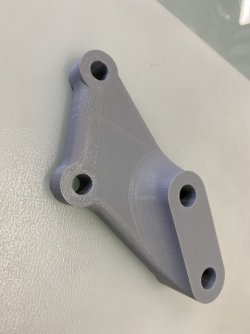
So the next step, I wanted to mock up the brakes in place , and a mate of mine has a 3d printer onboard the yacht he runs. Due to covid, they are cruising the islands around here, a quick WhatsApp with the file attached in a message saw them put my sample calliper adaptors in their build line. They use their printer for all sorts of things, its cheap, cheerful, and really handy. We did some changes to set ups on their race set up last year, and they printed sheaves to replicate the new set up, which allowed boat builders to come in and make carbon sheave boxes etc , while the real sheaves were being machined up with my guys in Milan. 3 d printing can save a lot of time!
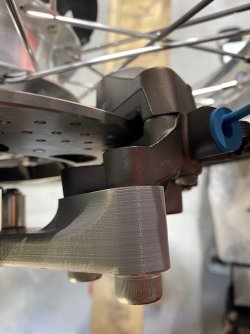
Each adaptor takes just over 4 hours to print, uses a few grams of recycled plastic, and not much electricity. As this is a budget printer, the finish is a bit rough, but its accurate where its important with hole centres etc. Im not going to spend any time cleaning the printed items up, if they are found to fit, they arrive tomorrow when the yacht is back in port where my office is. So hopefully by monday I will have sent the file onto my machinists mates in Milan, and have them mill up a set.
<iframe src="https://player.vimeo.com/video/449608609" width="640" height="360" frameborder="0" allow="autoplay; fullscreen" allowfullscreen></iframe>
<p><a href="https://vimeo.com/449608609">3d print</a> from <a href="https://vimeo.com/user16136896">Todd C</a> on <a href="https://vimeo.com">Vimeo</a>.</p>
In my last job, I got involved with a joint project with a company called 'Protiq'. They are a sub-company of Phoenix Contact, the massive connector company. They equipped a whole factory with the capability to 3D print in pretty much any material that is currently 3D printable. Their aim is to offer a complete end to end online 3D print solution. You basically upload your STEP file, spec the parameters of what you want, material etc and they provide you with a quote. This included metallic options, so you could just bolt on what you get back!
Take a look, it's pretty cool ...
https://www.protiq.com/en/

sideshow
Hero member
motoddrob said:This is how I did my caliper adapters. I made the pattern out of 6mm and 8mm perspex with a 2mm sliver of styrene to give me 16mm.
The calipers I had were the 65mm spacing brembos.
I sent the pattern to a mate who has a precision engineering business. Finished product by CNC mill
20200821_144746 by Rob Berryman, on Flickr
20200821_144808 by Rob Berryman, on Flickr
20200821_144951 by Rob Berryman, on Flickr
That?s a really clever idea with the Perspex.
sideshow
Hero member
JO55 said:A very smart way of doing it!
In my last job, I got involved with a joint project with a company called 'Protiq'. They are a sub-company of Phoenix Contact, the massive connector company. They equipped a whole factory with the capability to 3D print in pretty much any material that is currently 3D printable. Their aim is to offer a complete end to end online 3D print solution. You basically upload your STEP file, spec the parameters of what you want, material etc and they provide you with a quote. This included metallic options, so you could just bolt on what you get back!
Take a look, it's pretty cool ...
https://www.protiq.com/en/
That?s a great idea having companies for rapid prototyping , but how do you get around ownership of your file ? In my case it does not matter so much , but how can you be sure not to lose your intellectual property ?
I think with a reputable German company like Protiq, you would be fine. I'd still talk with them to make sure if the IP was super sensitive. The problems come more from the rapid prototype companies that simply subcontract to 3D printing houses in China. There's potentially a lot of exposure there!sideshow said:That?s a great idea having companies for rapid prototyping , but how do you get around ownership of your file ? In my case it does not matter so much , but how can you be sure not to lose your intellectual property ?
sideshow
Hero member
JO55 said:I think with a reputable German company like Protiq, you would be fine. I'd still talk with them to make sure if the IP was super sensitive. The problems come more from the rapid prototype companies that simply subcontract to 3D printing houses in China. There's potentially a lot of exposure there!
Yes I agree on the exposure. That?s one of the reasons I?m looking at a good desktop mill at the moment. For the things I do , low volume is ok. And entry level mills that can do what I need them to , aren?t to costly. I love the metal printing idea. But those printers are too costly for me yet.

motoddrob
Hero member
- Location
- S/W Australia
Steph said:Lovely job Rob
Elegant design 8)
Hand made pattern ?
Cheers
Hi Steph,
sort of hand made. I scribe the shape I'm after onto 2mm styrene sheet and shape by hand and then use it to router out the shape in perspex using a straight cutter with bearing.
In this case 2 separate shapes then glue them together using Methaline dichloride. Done.
Being a Model Maker for most of my working life makes it an easy job. Lucky to have a mate with a multi axis mill to convert it to ally. Cost me a carton of beer.

Dellortoman
Hero member
- Location
- Tasmania, Australia
motoddrob said:Lucky to have a mate with a multi axis mill to convert it to ally. Cost me a carton of beer.
I'd ask for the carton of beer back if I were you. He didn't follow your pattern very closely.

sideshow
Hero member
\Kickback said:A brilliant read thank you, I just love your attention to detail.
I was interested in your choice of colour as you mentioned that you were not really a fan of orange and you have gone with your heart on every other detail. Personally I think it's a smart choice and will really link the more avant garde detail back to the iconic Jota theme, but did you have another colour lurking at the back of your mind? Will it come back to bug you?
the orange.... it just felt right, I guess the first bike you see of a brand, leaves an impression on you, The first Laverda I saw was an SFC, it was Orange, and thats just how its meant to be. My fairing and tank and seat unit are all SFC shaped or inspired? And so Orange it had to be me. I dont think every laverda has to be orange, but my bike just screams out to be so.
motoddrob
Hero member
- Location
- S/W Australia
Dellortoman said:I'd ask for the carton of beer back if I were you. He didn't follow your pattern very closely.
I gave him some license
 Definitely worth a carton of top shelf piss

steph
Hero member
- Location
- Torgny, Belgium
motoddrob said:Hi Steph,
sort of hand made. I scribe the shape I'm after onto 2mm styrene sheet and shape by hand and then use it to router out the shape in perspex using a straight cutter with bearing.
In this case 2 separate shapes then glue them together using Methaline dichloride. Done.
Being a Model Maker for most of my working life makes it an easy job. Lucky to have a mate with a multi axis mill to convert it to ally. Cost me a carton of beer.
(bigthumb)
I unfortunately do not have your experience but I will try to follow your procedure.
I have to make P08/300mm disks adapters.

motoddrob
Hero member
- Location
- S/W Australia
Steph said:(bigthumb)
I unfortunately do not have your experience but I will try to follow your procedure.
I have to make P08/300mm disks adapters.
If I can help out at all let me know
steph
Hero member
- Location
- Torgny, Belgium
motoddrob said:If I can help out at all let me know
Roger that .. cool
sideshow
Hero member
wow so after an age of what seems like I haven't achieved anything, I have had a positive week. Although jobs are getting ticked off the list, more jobs are being added swiftly.
I ran into things that I hadn't really thought about with the new CRS front forks, they have machined them only for a 20mm to 17mm spindle, No biggie I should have asked for more info when I was researching them, and it makes me feel like a dumb ass for not asking..... sometimes the excitement of new parts gets in the way of me asking the correct timely questions , but now that hiccup has presented itself I have a solution. I originally wanted to use the front spindle from my Jota but it was over sized in a few ways, length and girth... when would that be a problem in another context ! So plan B, I decided to use the existing one to turn down to fit , I should have taken photos, but the metal on the threaded end, when I machined from 20mm to 17mm was pretty eaten up ( the spindle was randomly too long too), once I started turning it, It looked like a large turnbuckle pin from a 50 meter yacht that had seen 3 years of electrolysis , the metal was really porous , so it has now become the mock up spindle until I make a new one...... The next issue was the forks have odd dimensions in the lowers, so the spoked wheel and discs had no space between the lowers and the discs, so after talking with Gijs and Q , I went with skimming 1mm of the mating face of the disc carrier to the wheel hub, as I am using stainless discs they are 5mm thick, there was a bit of lip as well of the carrier to the disc, so I machined .25mm of there and gained myself 1.25 mm each side of the discs, which lets me spin the wheel freely. The next thing is I need to do a bit more work on the brake adaptor brackets, but that is in the next few days.
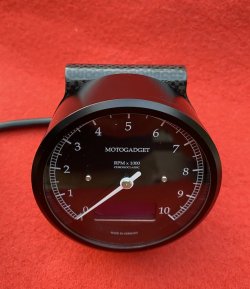
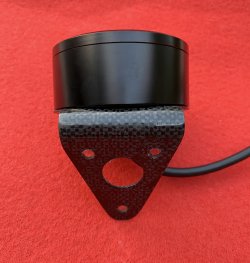
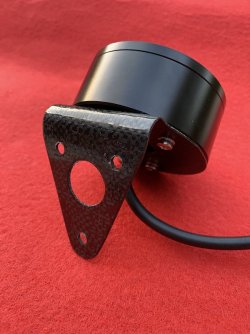
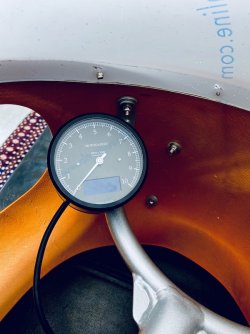
In the mean time the carbon version of the Smiths rev counter bracket came out insanely good, it weighs absolutely nothing. Once I have worked out a price i will do a limited run of 10-20 if anyone is interested. On this one I didn't do all the cut outs as per the smiths one, but can easily do so, this one is made to fit my Motogadget chrono classic and its bucket .....
Late this afternoon at work it was was a bit of a shopping day as well, I thought stuff it, I have been at work 10 out of 14 days of my vacation, time to play up a bit . ( no complaints about working in my holiday, but that means I can justify stealing an hour here and there for bike stuff ) I managed to find a Brembo PS13 rear brake master cylinder, I managed to find one in France in dark grey/ titanium, which matches my new brake callipers. Then I found in Italy the push rods that go with it, so I bought a couple of those and some exhaust manifold gaskets for my Ducati at the same place along with a few other bits and bobs .. basically I just loaded the shopping basket up until the shipping price changed, and then took one off two of the things out to make the shipping cost go down to the minimum rate.
So in all a successful week, hopefully next week battery box will be buttoned down, and then I can look at brake and clutch reservoirs and a bunch of other stuff.... the list goes on, sometimes its great fun, other times its a chore, especially where Im not so confident. I mentioned to Q the other day, if my bike was a sail boat , I would know exactly what to do, and could give solutions to issues that arrive quite quickly.... its frustrating sometimes not knowing bikes like i know sail boats
a big thanks to Marnix and Q and Gijs, they often answer messages and mails at odd times of the day, when my head is in the zone of my bike, you guys are great at always giving positive answers.
I ran into things that I hadn't really thought about with the new CRS front forks, they have machined them only for a 20mm to 17mm spindle, No biggie I should have asked for more info when I was researching them, and it makes me feel like a dumb ass for not asking..... sometimes the excitement of new parts gets in the way of me asking the correct timely questions , but now that hiccup has presented itself I have a solution. I originally wanted to use the front spindle from my Jota but it was over sized in a few ways, length and girth... when would that be a problem in another context ! So plan B, I decided to use the existing one to turn down to fit , I should have taken photos, but the metal on the threaded end, when I machined from 20mm to 17mm was pretty eaten up ( the spindle was randomly too long too), once I started turning it, It looked like a large turnbuckle pin from a 50 meter yacht that had seen 3 years of electrolysis , the metal was really porous , so it has now become the mock up spindle until I make a new one...... The next issue was the forks have odd dimensions in the lowers, so the spoked wheel and discs had no space between the lowers and the discs, so after talking with Gijs and Q , I went with skimming 1mm of the mating face of the disc carrier to the wheel hub, as I am using stainless discs they are 5mm thick, there was a bit of lip as well of the carrier to the disc, so I machined .25mm of there and gained myself 1.25 mm each side of the discs, which lets me spin the wheel freely. The next thing is I need to do a bit more work on the brake adaptor brackets, but that is in the next few days.
In the mean time the carbon version of the Smiths rev counter bracket came out insanely good, it weighs absolutely nothing. Once I have worked out a price i will do a limited run of 10-20 if anyone is interested. On this one I didn't do all the cut outs as per the smiths one, but can easily do so, this one is made to fit my Motogadget chrono classic and its bucket .....
Late this afternoon at work it was was a bit of a shopping day as well, I thought stuff it, I have been at work 10 out of 14 days of my vacation, time to play up a bit . ( no complaints about working in my holiday, but that means I can justify stealing an hour here and there for bike stuff ) I managed to find a Brembo PS13 rear brake master cylinder, I managed to find one in France in dark grey/ titanium, which matches my new brake callipers. Then I found in Italy the push rods that go with it, so I bought a couple of those and some exhaust manifold gaskets for my Ducati at the same place along with a few other bits and bobs .. basically I just loaded the shopping basket up until the shipping price changed, and then took one off two of the things out to make the shipping cost go down to the minimum rate.
So in all a successful week, hopefully next week battery box will be buttoned down, and then I can look at brake and clutch reservoirs and a bunch of other stuff.... the list goes on, sometimes its great fun, other times its a chore, especially where Im not so confident. I mentioned to Q the other day, if my bike was a sail boat , I would know exactly what to do, and could give solutions to issues that arrive quite quickly.... its frustrating sometimes not knowing bikes like i know sail boats
a big thanks to Marnix and Q and Gijs, they often answer messages and mails at odd times of the day, when my head is in the zone of my bike, you guys are great at always giving positive answers.
Attachments

piranha-bro2
Hero member
- Location
- Melbourne
That carbon bracket looks a treat, Todd. How do you (or they) fabricate something like that? It's not from a mould is it?

sideshow
Hero member
Piranha Brother 2 said:That carbon bracket looks a treat, Todd. How do you (or they) fabricate something like that? It's not from a mould is it?
Hi Q, a mate of mine Nipper, made it, we thought of several ways of doing it, this is version one, it's made on a male mould or former rather, The carbon is cut to shape, then vacuumed down over the former/mould, and then trimmed to shape.
Version two will be made on a female mould, so the smoothest face is facing out when mounted. We made the former by bending some stainless to the same angle as the smiths bracket. It was pretty easy, the length of the version two mould/ former will be dictated by how many brackets we want to make at a time, so probably about 1 meter long , which means we can lay up 10 at a time, or less if we only want one or two.
The photos show a hastily clear coated bracket, with mounting holes that I had just drilled. But the bracket is actually really really nice
sideshow
Hero member
Paul Marx said:I wouldn't feel good with a thing called gadget on my motorcycle.
8)
Paul

I dont spend much time looking at it.
sideshow
Hero member
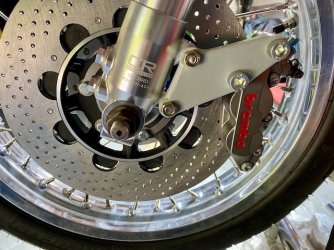
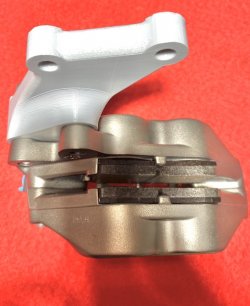
So onto version 2 of the brake adaptor bracket, version 1 didn't quite fit, but it was a good starting point. I actually found that with the brake caliper and the wheels Im using, I had to make the caliper adaptor twice as thick in some places. Luckily I had 4 printed, so I could use two together for one side, I then needed to contour the back a bit to be able to have the fork mounting lugs be in the clear. Once that was done, we re-drew the adaptor and sculpted it a lot more. Yesterday we printed the new model and hey presto she fits. A little more tweaking needs to be done, more for aesthetics than anything, But that will be almost how the finished product looks. Im looking at machining these in Grade 5 TI. Lets see if that becomes a reality !