
You are using an out of date browser. It may not display this or other websites correctly.
You should upgrade or use an alternative browser.
You should upgrade or use an alternative browser.
wanted - moto giro bike
- Thread starter Paul LeClair
- Start date

AJ
Senior member
- Location
- 38°33'00.0"S 177°55'00"E
You would have to make one. Not an off the shelf item. We resort to stepped keysteel keys for mismatched components.How much drama would finding an offset Woodruff key be, you never know till you try.

- Location
- Calgary, Alberta, Canada
thnaks again, all!! Especially Cam and Piet.
I am not sure how the cam gear and the crank gear are mounted. I was imagining pressing one off its respective shaft, etc., but have come to the conclusion that the cam timing is now as good as it is going to get on this 7 hp monster motor..... At least I know it is as accurate as possible. My original assembly, copying the way it waswhen I got the non running motor, was off roughly 40 degrees, so this has been a very worthwhile exercise and I learned a lot about what I didn't know about cam timming and now have some understanding of.
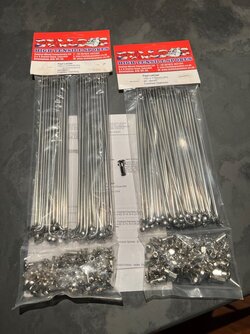
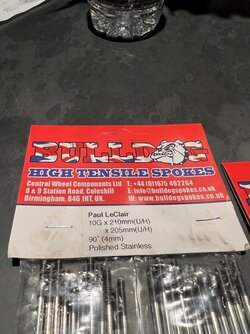
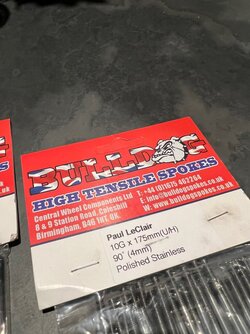
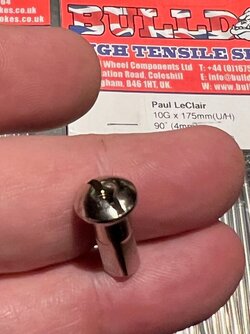
the custom made polished stainless steel spokes and nipples for the new rims arrived to day from Central Wheel in the UK. Very shiny, very nice looking. Now I have to make the time to get back to polishing the wheel hubs. When I was cleaning up the engine cases I also bead blasted the wheel hubs and sanded them to take out the worst of the defects. I haven't done the very messy job of mirror polishing the wheel hubs and a few other bits yet. I bought a new pair of coveralls and a fresh pair of safety goggles the other day in preparation for polishing, I always wind up looking like a coal miner. My 5 hp home made polishing rig works really well, just messy as .......

I am not sure how the cam gear and the crank gear are mounted. I was imagining pressing one off its respective shaft, etc., but have come to the conclusion that the cam timing is now as good as it is going to get on this 7 hp monster motor.....
At least I know it is as accurate as possible. My original assembly, copying the way it waswhen I got the non running motor, was off roughly 40 degrees, so this has been a very worthwhile exercise and I learned a lot about what I didn't know about cam timming and now have some understanding of.the custom made polished stainless steel spokes and nipples for the new rims arrived to day from Central Wheel in the UK. Very shiny, very nice looking. Now I have to make the time to get back to polishing the wheel hubs. When I was cleaning up the engine cases I also bead blasted the wheel hubs and sanded them to take out the worst of the defects. I haven't done the very messy job of mirror polishing the wheel hubs and a few other bits yet. I bought a new pair of coveralls and a fresh pair of safety goggles the other day in preparation for polishing, I always wind up looking like a coal miner. My 5 hp home made polishing rig works really well, just messy as .......
Attachments

Thanks Paul.Hi Paul
best online manual resource I was referred to is https://www.rpw.it/Documentazione.htm I just checked, there are a couple of 175 manuals, and cam timing in the 175 manual seems to me to be exactly the same as my 150, but have a look for yourself.
Paul LeClair
Our Finnish friend also sent me a mail, so the link is safely stored.
My son having found all the parts for his 175, he announced to me Sunday that he'd be turning up at home with his Gilera engine.
I need to look like I know what I'm talking about.
Paul
- Location
- Calgary, Alberta, Canada
Hi Paul
sole tech challenge was the cam timing, everything else was straightforward and self explanatory. The only dis assembly issue was pulling the 8 or 9 blind bearings, I broke two pullers on the smallest/shallowest bearing. Resorted to welding a bolt to the stubborn bearing and attaching the bolt to the puller. All the bearings were readily available from my local transmission bearing supply shop from stock.
Check the valve stems for wear from the odd collet arrangement and the extended collet groove in each valve stem. On my engine neither valve could be rescued because of collet damage to the valve stem.
If I had known good cam timing from a running engine, I would probably confirm cam timing from lobe centers before splitting the engine cases, then mark before dis assembly. There were no timing marks in my engine.
Have fun.
Paul LeClair
sole tech challenge was the cam timing, everything else was straightforward and self explanatory. The only dis assembly issue was pulling the 8 or 9 blind bearings, I broke two pullers on the smallest/shallowest bearing. Resorted to welding a bolt to the stubborn bearing and attaching the bolt to the puller. All the bearings were readily available from my local transmission bearing supply shop from stock.
Check the valve stems for wear from the odd collet arrangement and the extended collet groove in each valve stem. On my engine neither valve could be rescued because of collet damage to the valve stem.
If I had known good cam timing from a running engine, I would probably confirm cam timing from lobe centers before splitting the engine cases, then mark before dis assembly. There were no timing marks in my engine.
Have fun.
Paul LeClair

martymoose
Hero member
- Location
- Sydney, Australia
My austin 7 race car has a stepped woodruff key to advance the camshaft. I got it from one of the older racing guys, 30 years ago. Dont think it was a bought item, hand made.
Great thread Paul, really enjoying it.
Great thread Paul, really enjoying it.
Anyone got a pic of one of those stepped keys, I don't understand how anything wider than the slot in the shaft can fit between the tapered shaft and flywheel.. Must be something simple I am missing. Found this.

 accessories.hitchcocksmotorcycles.com
93160
WOODRUFF KEY SET (SET OF ALL 4 KEYS) STEPPED FOR LEANBURN MODELS
Last edited:
martymoose
Hero member
- Location
- Sydney, Australia
Yep that is exactly what mine looks like

breganzane
Hero member
- Location
- NSW Australia
Don't forget these sort of applications, the key is not to transmit power - it is only for (easy) alignment. For example, if everything is correct, you can put a Laverda 750 together without any key at all as long as you manually time the cams. The key is a useful safety net when/if the flanges loosen on the cam, you get the familiar rattle instead of a valve bashing end-of-days. But in normal operation the key is not doing the work - the fit of the cams-to-flanges or the tighhtness of the sprocket-to-flange bolts is doing it.
Woodruff keys - there is one on the RHS of a Series1 Lav but it is only there to *align* the TDC mark on the alternator rotor - the taper transmits the power. Ditto on the LHS of a S2 - alignment of the pickup rotor only, the tightness of the cap screw transmits the (modest) power involved in keeping the rotor in position.
I can see a stepped key would be useful when setting something up, ie if you knew that for a given application a 0.5mm step in the key delivered a 2deg offset or whatever. Then you can do your timing measurement, work out the nearest offset you require and use that key. The cross-sectional area of the shear plane between the offsets is going to be smaller than the original, but it should not be transmitting any power, so once tightened it shouldn't matter.
Woodruff keys - there is one on the RHS of a Series1 Lav but it is only there to *align* the TDC mark on the alternator rotor - the taper transmits the power. Ditto on the LHS of a S2 - alignment of the pickup rotor only, the tightness of the cap screw transmits the (modest) power involved in keeping the rotor in position.
I can see a stepped key would be useful when setting something up, ie if you knew that for a given application a 0.5mm step in the key delivered a 2deg offset or whatever. Then you can do your timing measurement, work out the nearest offset you require and use that key. The cross-sectional area of the shear plane between the offsets is going to be smaller than the original, but it should not be transmitting any power, so once tightened it shouldn't matter.
Thanks Paul. I've been following this thread with great interest.Hi Paul
sole tech challenge was the cam timing, everything else was straightforward and self explanatory. The only dis assembly issue was pulling the 8 or 9 blind bearings, I broke two pullers on the smallest/shallowest bearing. Resorted to welding a bolt to the stubborn bearing and attaching the bolt to the puller. All the bearings were readily available from my local transmission bearing supply shop from stock.
Check the valve stems for wear from the odd collet arrangement and the extended collet groove in each valve stem. On my engine neither valve could be rescued because of collet damage to the valve stem.
If I had known good cam timing from a running engine, I would probably confirm cam timing from lobe centers before splitting the engine cases, then mark before dis assembly. There were no timing marks in my engine.
Have fun.
Paul LeClair
We might post our findings here.
My son will have to book workshop time, it's pretty full.
Paul
Did the same once with the key on a Husky 2 stroke when I was changing alternators. It needed lapping onto the taper with valve grinding paste to get a solid contact and allow the taper to take the load. It even said so in the manual but I missed it the first time, it didn't need much but there was some manufacturing slight error, 10 minutes of rubbing had it fully seated. It hurts kicking with the timing out a bit.

Tippie
Hero member
- Location
- Dr?bak, Norway
We once did it successfully roadside with toothpaste and salt as lapping medium, had to take it in turns either kicking or holding the flywheel, but we cheated, Vince, and took out the spark plug.
AJ
Senior member
- Location
- 38°33'00.0"S 177°55'00"E
Classic!We once did it successfully roadside with toothpaste and salt as lapping medium, had to take it in turns either kicking or holding the flywheel, but we cheated, Vince, and took out the spark plug.
- Location
- Calgary, Alberta, Canada
keyways and keys - for the VAPE 12 volt conversion with digital ignition, http://www.vape.cz/en/ the factory engineer had me determine and provide engine rotation direction, then measure the crankshaft end and taper in several spots, as well as the available case cavity size, and send them photos of the measurement results. There is no key/keyway and the fit is just going to be tight on the crank taper. Took an exchange of several emails before they were satisfied with the measurements and the fitting for what they are supplying. I am going to check how tight the fit on the taper actually is, if necessary I may apply some valve grinding paste to fine tune the fit on the taper.
good thing I just went through the valve timing exercise with the help from the folks here, as now I have to determine ignition timing from scratch as well. I just got notice from UPS that the VAPE system is due for delivery to my house tomorrow, I just paid the Import fees online. Am finished my Court work obligations for the week, so going to get back to polishing the wheel hubs and various other bits, then chase down the fellow who is going to show me how to properly build the wire wheels with the offsets we measured before I took the wheels apart.
The Heidenau tires I ordered and paid for from a supplier in California, U.S.A. December 21, 2021 arrived yesterday, finally. Almost two full months delivery time from when they were shipped through the United States Post Office International Service. I think they were held in Customs for most of that time, for no apparent reason. The Heidenau tires are 2.75 x 19, narrowest they were available. Specified size for the bike is 2.50, hoping the tiny little extra width won't be a clearance issue, we'll see. Supply issues - I had to buy from an out of country supplier as the Canadian importer was out of stock and indicated they had no idea if/as/when they would be getting fresh stock, they are still out of stock.
good thing I just went through the valve timing exercise with the help from the folks here, as now I have to determine ignition timing from scratch as well. I just got notice from UPS that the VAPE system is due for delivery to my house tomorrow, I just paid the Import fees online. Am finished my Court work obligations for the week, so going to get back to polishing the wheel hubs and various other bits, then chase down the fellow who is going to show me how to properly build the wire wheels with the offsets we measured before I took the wheels apart.
The Heidenau tires I ordered and paid for from a supplier in California, U.S.A. December 21, 2021 arrived yesterday, finally. Almost two full months delivery time from when they were shipped through the United States Post Office International Service. I think they were held in Customs for most of that time, for no apparent reason. The Heidenau tires are 2.75 x 19, narrowest they were available. Specified size for the bike is 2.50, hoping the tiny little extra width won't be a clearance issue, we'll see. Supply issues - I had to buy from an out of country supplier as the Canadian importer was out of stock and indicated they had no idea if/as/when they would be getting fresh stock, they are still out of stock.
- Location
- Calgary, Alberta, Canada
after mulling Gilera crank/cam timing over in my head the last several days (don't I lead an exciting life) I came to a realization.
on dis assembly and re assembly of the engine I had noted to myself that the crank is finely splined to the internal drive gear with with a rod. Thinking on it now I have just now realized that results in the crank being very finely internally adjustable to the cam gearing..
In plainer English, I had looked at the arrangement, thought isn't that strange, and had not realized that the timing between the crank and the intermediary gear can can be adjusted very finely by simply lifting the crank on the very fine splines, and moving the crank a tiny little spline at a time. No excuses for not figuring it out, other than I simply did not know what I was doing going into this cam timing exercise. Now I have some basic understanding, it has become rather obvious at this very late stage what the fine splines must be for..
bloody hell - now I have figured it out, all I would have to do I set the cam exactly where it needs to be in relation to TDC, then lift the crank off the very fine internal splines, and set the crank down on the fine internal splines at exactly TDC... very clever 1950's Italian design, bloody hell, went right over my head. Now I have to decide if I am going to spilt the cases again to get exactly 106/106 or leave it as is...?
I will see if I have photos showing what I am trying to describe,, but bottom line is none of this is described in any manual I found, I guess 1950's Italians just knew this sort of stuff and there was no need for any explanations or any sissy timing marks......
on dis assembly and re assembly of the engine I had noted to myself that the crank is finely splined to the internal drive gear with with a rod. Thinking on it now I have just now realized that results in the crank being very finely internally adjustable to the cam gearing..
In plainer English, I had looked at the arrangement, thought isn't that strange, and had not realized that the timing between the crank and the intermediary gear can can be adjusted very finely by simply lifting the crank on the very fine splines, and moving the crank a tiny little spline at a time. No excuses for not figuring it out, other than I simply did not know what I was doing going into this cam timing exercise. Now I have some basic understanding, it has become rather obvious at this very late stage what the fine splines must be for..
bloody hell - now I have figured it out, all I would have to do I set the cam exactly where it needs to be in relation to TDC, then lift the crank off the very fine internal splines, and set the crank down on the fine internal splines at exactly TDC... very clever 1950's Italian design, bloody hell, went right over my head. Now I have to decide if I am going to spilt the cases again to get exactly 106/106 or leave it as is...?
I will see if I have photos showing what I am trying to describe,, but bottom line is none of this is described in any manual I found, I guess 1950's Italians just knew this sort of stuff and there was no need for any explanations or any sissy timing marks......
Normski
Senior member
- Location
- Devon, England
A lot of engines run well with the cam timing set to equal lift at 4 degrees (crank) btdc on the exhaust stroke.after mulling Gilera crank/cam timing over in my head the last several days (don't I lead an exciting life) I came to a realization.
on dis assembly and re assembly of the engine I had noted to myself that the crank is finely splined to the internal drive gear with with a rod. Thinking on it now I have just now realized that results in the crank being very finely internally adjustable to the cam gearing..
In plainer English, I had looked at the arrangement, thought isn't that strange, and had not realized that the timing between the crank and the intermediary gear can can be adjusted very finely by simply lifting the crank on the very fine splines, and moving the crank a tiny little spline at a time. No excuses for not figuring it out, other than I simply did not know what I was doing going into this cam timing exercise. Now I have some basic understanding, it has become rather obvious at this very late stage what the fine splines must be for..
bloody hell - now I have figured it out, all I would have to do I set the cam exactly where it needs to be in relation to TDC, then lift the crank off the very fine internal splines, and set the crank down on the fine internal splines at exactly TDC... very clever 1950's Italian design, bloody hell, went right over my head. Now I have to decide if I am going to spilt the cases again to get exactly 106/106 or leave it as is...?
I will see if I have photos showing what I am trying to describe,, but bottom line is none of this is described in any manual I found, I guess 1950's Italians just knew this sort of stuff and there was no need for any explanations or any sissy timing marks......
AJ
Senior member
- Location
- 38°33'00.0"S 177°55'00"E
You will have plenty of time during the Moto Giro to mull it over!after mulling Gilera crank/cam timing over in my head the last several days (don't I lead an exciting life) I came to a realization.
on dis assembly and re assembly of the engine I had noted to myself that the crank is finely splined to the internal drive gear with with a rod. Thinking on it now I have just now realized that results in the crank being very finely internally adjustable to the cam gearing..
In plainer English, I had looked at the arrangement, thought isn't that strange, and had not realized that the timing between the crank and the intermediary gear can can be adjusted very finely by simply lifting the crank on the very fine splines, and moving the crank a tiny little spline at a time. No excuses for not figuring it out, other than I simply did not know what I was doing going into this cam timing exercise. Now I have some basic understanding, it has become rather obvious at this very late stage what the fine splines must be for..
bloody hell - now I have figured it out, all I would have to do I set the cam exactly where it needs to be in relation to TDC, then lift the crank off the very fine internal splines, and set the crank down on the fine internal splines at exactly TDC... very clever 1950's Italian design, bloody hell, went right over my head. Now I have to decide if I am going to spilt the cases again to get exactly 106/106 or leave it as is...?
I will see if I have photos showing what I am trying to describe,, but bottom line is none of this is described in any manual I found, I guess 1950's Italians just knew this sort of stuff and there was no need for any explanations or any sissy timing marks......