This bloody bike. 1976 3CE

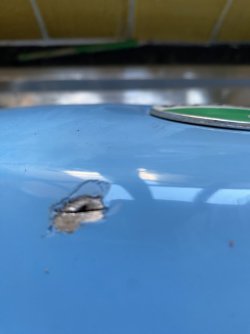
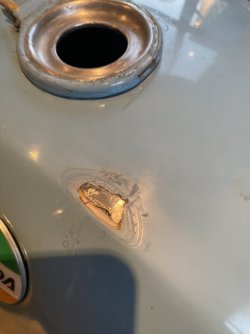
The hole must be welded up, and any search on this forum regarding tank liners should scare you off. Even ones that do not break up in the tank create a nightmare for future crash damage.
If welding a fuel tank use nature as your helper. Set the tank in a warm ventilated place, upside down and let the heavier than air fuel vapours pour out. In Australia the sun did the job in a few hours, in Norway we have sat in near a heater over night. You can see the fumes pouring out and after a while there is not even a whiff of petrol. Test as suggested. Water washing even for days with running water has had tanks explode injuring/killing people.
 
You've already got the Ignitech stuff. Can't you source a new system of pickups and eliminate that from your quest? I know you can't use Hall Effect pickups if your Ignitech box isn't programmed for it, but surely there are new pickups/trigger (both?) you can install? It's a shame you can't just toss the lot and install one of Red's alternator-ignition systems complete. It would be nice if the issue were as simple as restrictive fuel taps, but it's piss easy to check that ... just pull the taps apart. They worked when the bike was new, so unless blocked, why not now???
 
You've already got the Ignitech stuff. Can't you source a new system of pickups and eliminate that from your quest? I know you can't use Hall Effect pickups if your Ignitech box isn't programmed for it, but surely there are new pickups/trigger (both?) you can install? It's a shame you can't just toss the lot and install one of Red's alternator-ignition systems complete. It would be nice if the issue were as simple as restrictive fuel taps, but it's piss easy to check that ... just pull the taps apart. They worked when the bike was new, so unless blocked, why not now???
A tap in 100% condition should deliver around I litre in a minute - just pull the pipes off and decant into a measured jug
 
The hole must be welded up, and any search on this forum regarding tank liners should scare you off. Even ones that do not break up in the tank create a nightmare for future crash damage.
If welding a fuel tank use nature as your helper. Set the tank in a warm ventilated place, upside down and let the heavier than air fuel vapours pour out. In Australia the sun did the job in a few hours, in Norway we have sat in near a heater over night. You can see the fumes pouring out and after a while there is not even a whiff of petrol. Test as suggested. Water washing even for days with running water has had tanks explode injuring/killing people.
I cannot for the life of me understand why a tank that has been washed out with water exploding, once the tank is full of water it can’t have any fumes let alone washing for days. A two stroke tank may feasibly have oil residue which could smoke a bit. I always wash them out with a hose never a problem . I’m fucked if I’d leave one near a heater.
 
I use to have the Motodd alloy tank welded every other week. My welder was happy if I washed the tank out with soapy water.
Other welders in the past would just fill it with inert gas, would put a hose onto an exhaust pipe and the other end into the tank.
Did the BM tank a couple of years back using the same method.
 
Ok so I’ve soldered the hole in the tank, filled it and prepped for paint which I will do tomorrow.
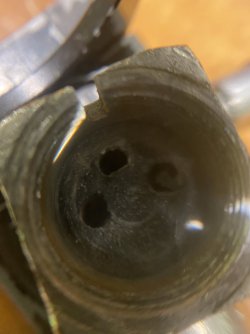
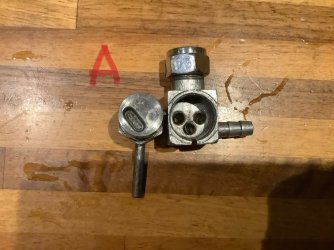
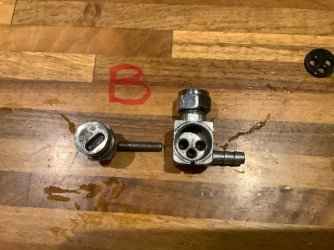
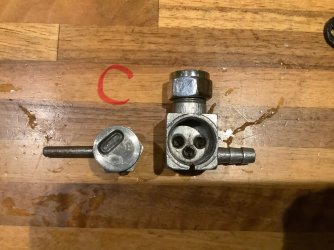
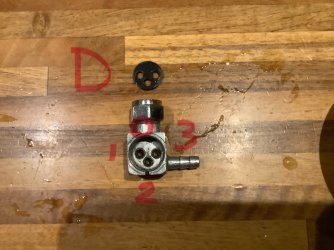
Looking into the fuel taps I realise that I’ve been using straight down for on when it is reserve - the outlet hole is smaller on reserve than the bore of the plastic tube which provides supplies the main supply of fuel. That may cause flow issues especially as I removed a small piece of rubber from the reserve channel which looks like it came from the rubber gasket that has three holes in it. See pics if you can.
Small piece of rubber to the left of the tap in the last picture.IMG_3796.jpegIMG_3797.jpegIMG_3803.jpegIMG_3804.jpeg
So, maybe around Wednesday I put some petrol in it and see if it will rev more cleanly.
 
The usual lever direction for those taps is forward for OFF, down for ON and back for RES.
As far as I can work out, lefthand tap, pic A connects hole 2 & 3. Smaller hole facing tank therefore reserve.
Pic B connects 1 & 2, larger hole facing tank, has tube in it, main fuel.
Pic C connects 3 & 0 therefore no flow = off.
Pic D hole 1 goes to larger bore hole plastic pipe fits in which is main tank.
Hole 2 goes to carbs
Hole 3 goes to smaller hole and is reserve
And 0 is blank therefore OFF.

Threads are good, rubber seals are good not DIY
 

Attachments

  • IMG_2151.jpeg
    IMG_2151.jpeg
    145.1 KB · Views: 21
  • IMG_2152.jpeg
    IMG_2152.jpeg
    149.2 KB · Views: 21
  • IMG_2153.jpeg
    IMG_2153.jpeg
    158.3 KB · Views: 21
  • IMG_2154.jpeg
    IMG_2154.jpeg
    130.8 KB · Views: 18
...you can swap the two different riser length tubes around and change the actual off-on-reserve rotational position from my depleting recall.
 
I'm guessing that if you swap the lever-and-distributor-plate over from left to right tap you'll alter the positions for off, on, reserve. Never seen one that wasn't fwd for off, down for on and back for res. Easy check using compressed air or WD40 or whatever.
 
Picture "b" is the reserve position. I'm thinking that larger diameter hole is there to maintain adequate fuel flow as a result of the decreased fuel head pressure in the tank.
The larger hole is there to take the single inlet tube which creates reserve. The smaller hole will not take a tube therefore runs as is.. My thinking might be that if my taps are configured so that in what I think has bee ON but in fact was reserve the fuel flow is restricted and I’ve not had a “clean & smooth” throttle at higher rpm. Hope to test idea on Wednesday.
 
Back
Top